Did you know that the most requested tutorial and our most popular blog post is Reconciling banking transactions in QuickBooks Online? That’s probably because most QuickBooks Online users understand the concept of connecting their bank and credit card accounts to QBO. Did you know that most mistakes in QBO are made because QuickBooks users don’t know how to work with banking transactions? Could you be making the biggest mistakes and not even know it? No worries. I have completely updated this blog post to provide you all the essentials you need (and lots of expert tips) so that you can get organized and feel in control when reconciling accounts in QuickBooks Online. I’ll even show you my method for helping you get organized and for learning how to add, match, and use batch actions.
I’ll warn you now – this is a long blog post. But those of you who persevere to the end will gain a wealth of knowledge to help you take your QBO banking transactions from mess to success. So, buckle up and get ready for the latest QuickBooks Online Banking Tutorial.
Our most popular blog post – QuickBooks Online Banking Tutorial
The #1 question I am asked all the time by new (and some not so new) QuickBooks Online users is: how to work with and reconcile banking transactions in QuickBooks Online. Working with banking transactions in QBO seems simple, but there are a few important things you need to know in order to avoid the most common mistakes that all new users make.
QuickBooks Online Banking Tutorial – contents
- Learn how to get around the banking center
- Add bank and credit card accounts to the chart of accounts
- Connect bank and credit card accounts to QuickBooks Online
- Things to know before you get started working with banking transactions in QuickBooks Online
- Reconciling banking transactions in QBO – how to organize yourself
- STEP 1 – Working with “Money Out” banking transactions in QuickBooks Online
- STEP 2 – Working with “Money In” banking transactions in QuickBooks Online
- STEP 3 – Working with Transfers in the Banking Center
- The #1 mistake untrained users make with banking transactions in QuickBooks Online
- 5 Minute Bookkeeping with QBO banking transactions
- Reconciling bank and credit card statements in QuickBooks Online
Learn how to get around the QuickBooks Online banking center
Here is a video tour of the banking center in QuickBooks Online. Check it out so you can learn all the features available in the QuickBooks Online Banking Center.
Add bank and credit card accounts to the chart of accounts
If you’re a QBO newbie, you first need to add your bank and credit card accounts to the chart of accounts. See my post for instructions on how to add accounts to the chart of accounts.
Expert tip: Add your business bank and credit card accounts (not personal accounts).
[Bank feeds in just 5 minutes a day? No problem!
>>Click Here to claim the free cheat sheet]<<
Connect bank and credit card accounts to QuickBooks Online
Now that you have added your business bank and credit card accounts to the chart of accounts, you are ready to connect your bank and credit card accounts to QBO.
[Expert tip: You should add bank and credit card accounts to the chart of accounts in QBO before connecting your QuickBooks Online to your financial institutions.]
From the Left Navigation Bar
Click Banking
Click Add Account on the upper right
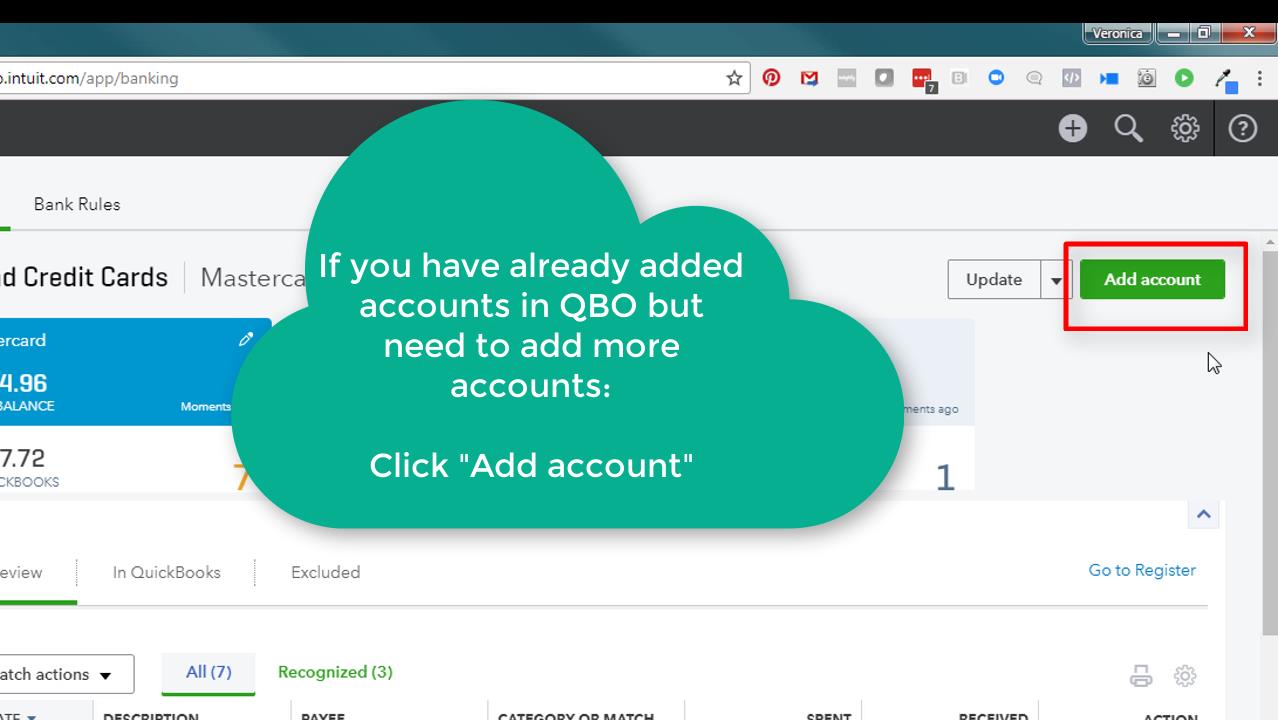
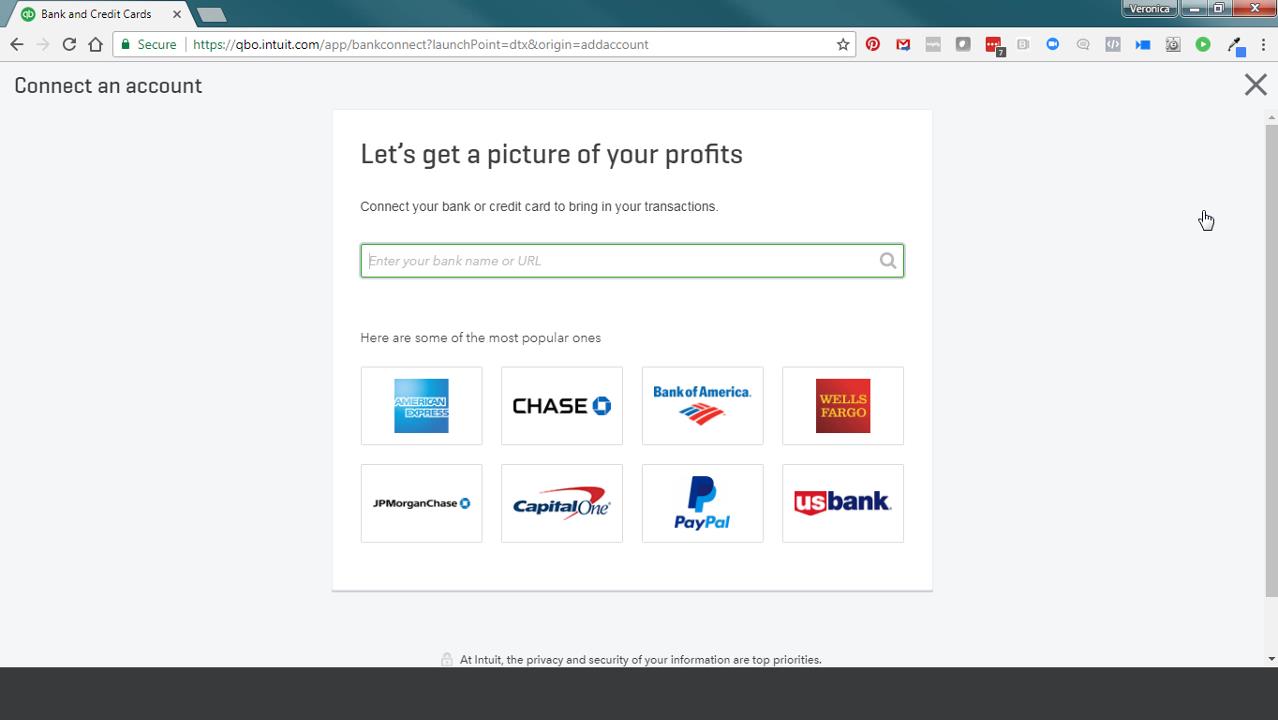
Enter the name of your Financial Institution or click the Logo of your Financial Institution
Enter your Online ID or User Name.
Enter your Passcode or Password. Then, click Log in.

The connection process may take a few minutes.

A window will appear asking you to map the bank accounts from your financial institution to the bank accounts in your chart of accounts list.
Select the bank or credit card account by clicking on the box next to it (on the left). Then, select the corresponding account you set up in the QuickBooks chart of accounts (on the right side).
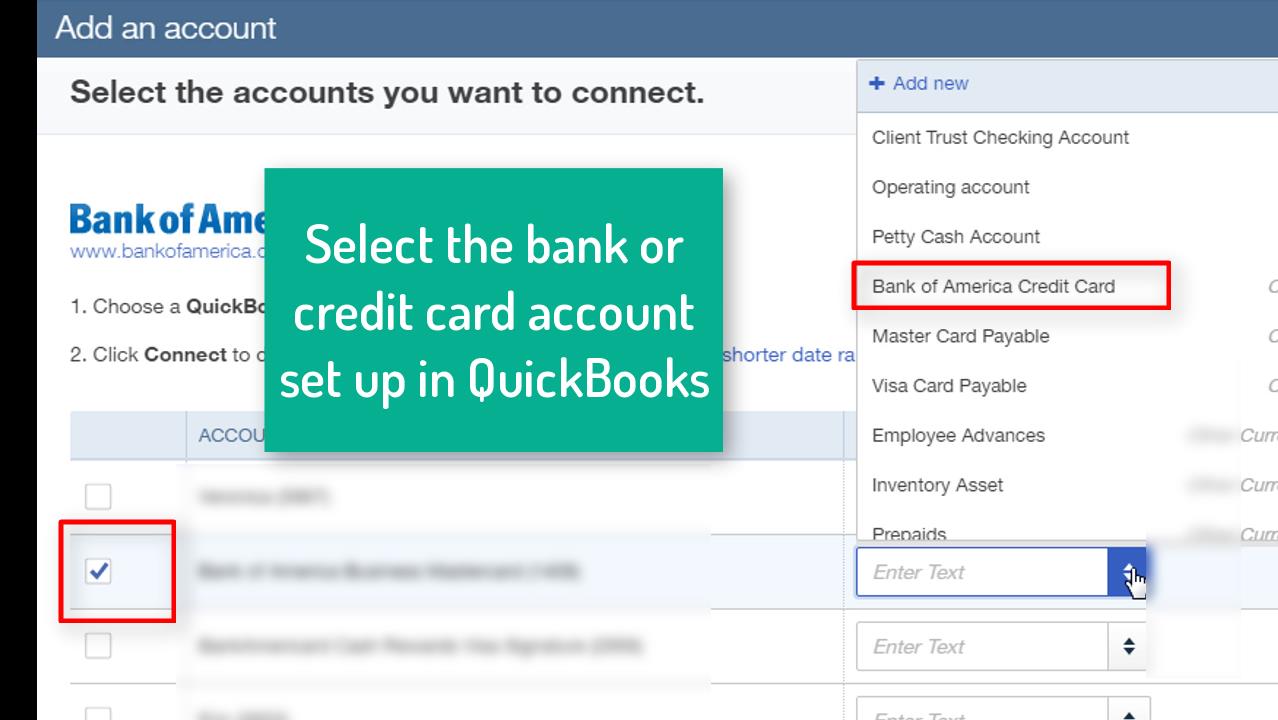
Typically, only 90 days of transactions will be downloaded.
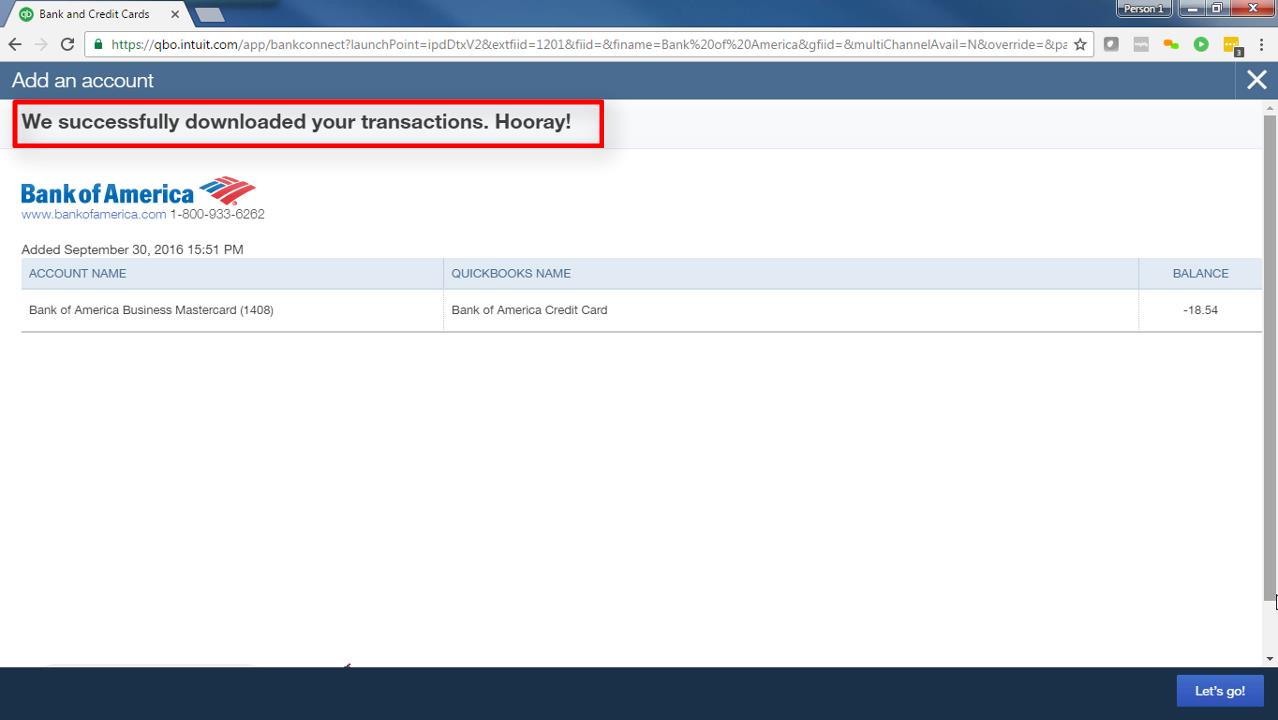
A window opens indicating that banking transactions were successfully downloaded.
Expert tip: If you are new to QBO, connect your bank and credit card accounts to QBO the first time you start using QBO. Transactions will download automatically. Even if it takes you a few months to get started with QBO, the banking transactions will be there.
[Bank feeds in just 5 minutes a day? No problem!
>>Click Here to claim the free cheat sheet]<<
Things to know before you get started working with banking transactions in QuickBooks Online
Keep a few things in mind when working with banking transactions in QuickBooks Online:
- It’s a tool to save data entry time
- It does not replace bookkeeping
- It’s not an automated process
- You still have to spend time on bookkeeping (but hopefully a lot less time)
Many new QuickBooks Online users are disappointed when they realize that banking transactions don’t automatically get recorded in QBO.
Reconciling banking transactions in QBO – how to organize yourself
Most QBO users get overwhelmed when they work with their banking transactions. That’s because they need a system. That’s why I created a 5-minute system for working with banking transactions. The idea is to work on similar types of transactions in order.
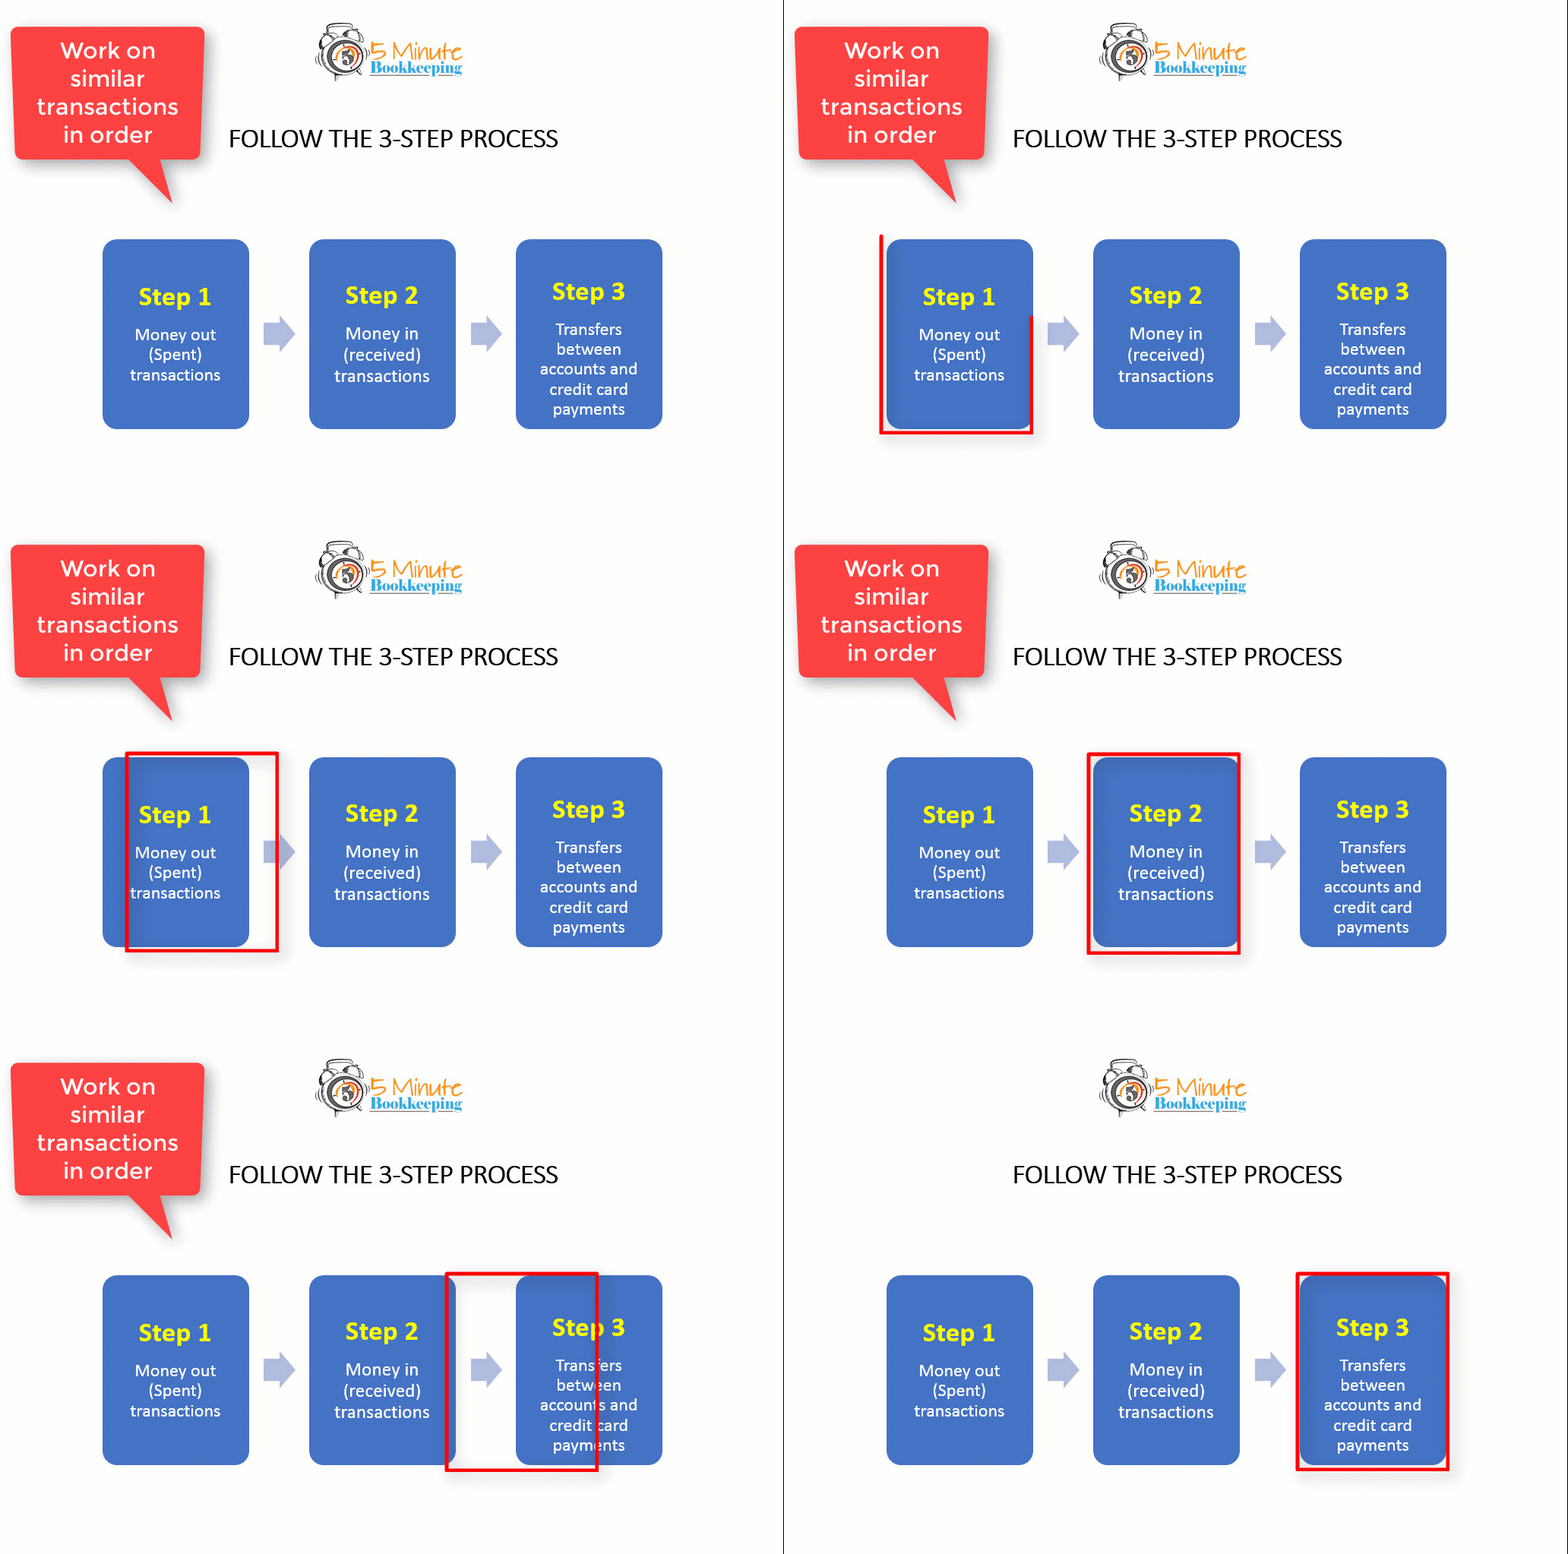
Work on banking transactions in the following order:
Step 1 – Money Out (spend) transactions
Step 2 – Money In (received) transactions
Step 3 – Transfers between accounts and credit card payments
STEP 1 – Working with “Money Out” banking transactions in QuickBooks Online

“Money Out” banking transactions include expenses and amounts in the “Spent” column in the Banking Center.
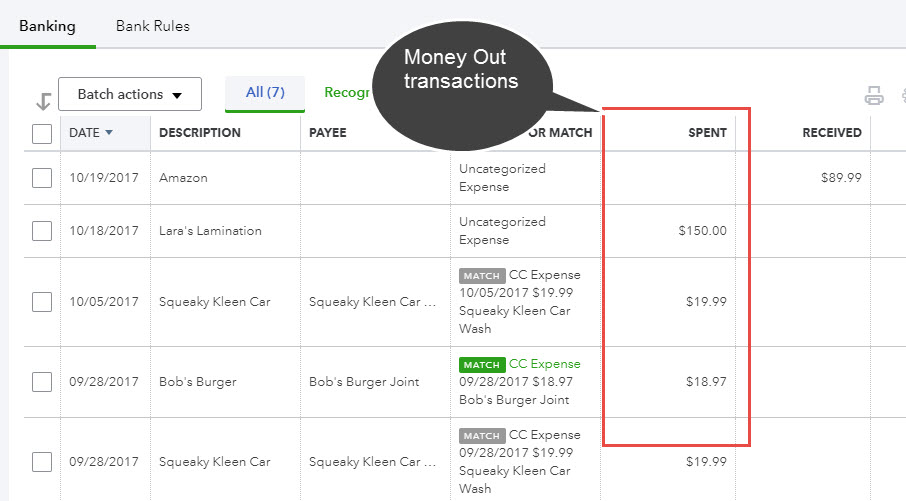
You can work with Money Out banking transactions in QBO in the following ways:
- Add
- Split
- Batch Actions
- Match
I’ll explain each of these method of working with Money Out banking transactions in QBO.
Add – how to add Money Out banking transactions in the QBO Banking Center
When you “add” transactions from the Banking Center, they are entered directly to QuickBooks.
Let’s work through an example using the QuickBooks Online Sample Company. Click here to access the QuickBooks Online Sample Company.
To add transactions, go to the Left Navigation Bar and click Banking.
The Banking Center window will open.
Click the “For Review” tab to add transactions.

Click on the Mastercard account to select it.

Click a transaction to view its details. In this example, let’s click on Lara’s Lamination.

A window will open to show you more details of the transaction.

It is important to verify that each transaction has a Name (vendor/payee) and Account (Category from the chart of accounts list). Memos (descriptions) are always helpful.

Let’s add the vendor name and account category. We’ll add Lara’s Lamination as the vendor name and Office Expenses as the account category.

Click Add to add the transaction to QuickBooks Online.
Split – How to add split banking transactions in the QBO Banking Center
What if the expense you want to add needs more than one account category? Let’s go through an example with another transaction.
Still working with the Credit Card account – click the “Amazon” transaction to view its details. The transaction window will open to show you more details.
Click Split to open the split transaction window.

From the split transaction window (as shown in the image below), enter the following:
- The vendor name (Amazon)
- The account categories (We are splitting the transaction between two account categories – Office Expenses and Supplies)
- The amounts for each account category (We are entering the corresponding amounts for each account category)
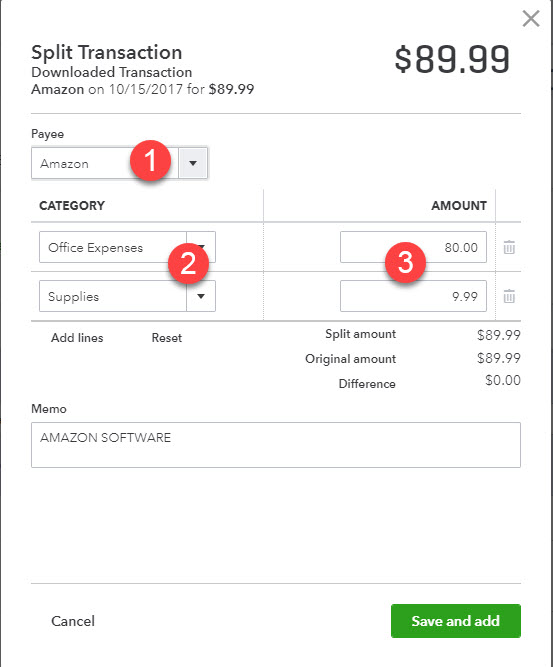
Click Save and add to add the transaction to QuickBooks.
Batch Actions – how to add multiple Money Out banking transactions in the QBO Banking Center
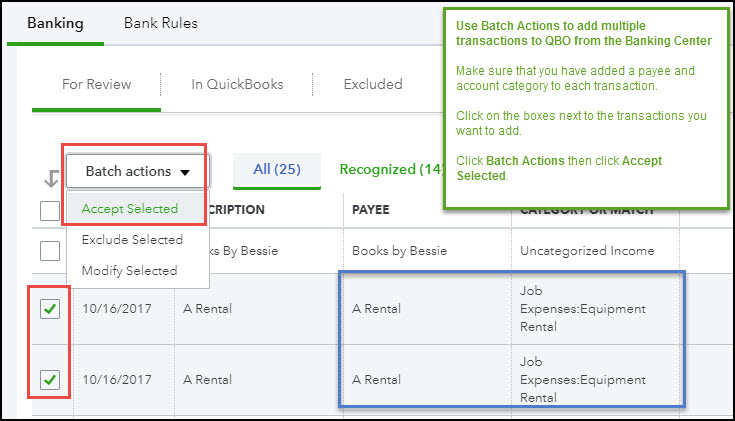
A great way to save time is to use Batch actions in the Banking Center. Rather than clicking Add on every transaction, you can add them in Batch.
Make sure that you have added a payee and account category to each transaction.
Click on the boxes next to the transactions you want to add.
Click Batch Actions then click Accept Selected.
Match – How to match Money Out banking transactions in the QBO Banking Center
If you have already manually entered banking transactions in QBO (like Checks or vendor Bill Payments) and then download them from your bank, you will see that QBO will show that the downloaded transactions are marked at “Matched” in QBO.
Don’t worry, these transactions are generally not duplicated, QBO already knows that they are entered in QuickBooks. Simply click on “Match” on the right to accept these transactions.

Expert tip: Pay careful attention to ensure that you enter transactions in QuickBooks with the correct date and amount. Sometimes transactions do not match because of incorrect dates and amounts.
Expert tip: You can also use Batch action to add multiple matched transactions at the same time.
STEP 2 – Working with “Money In” banking transactions in QuickBooks Online

“Money In” transactions in QuickBooks Online are amounts received or deposited. Amounts received are listed under the “Received” column in the banking center.
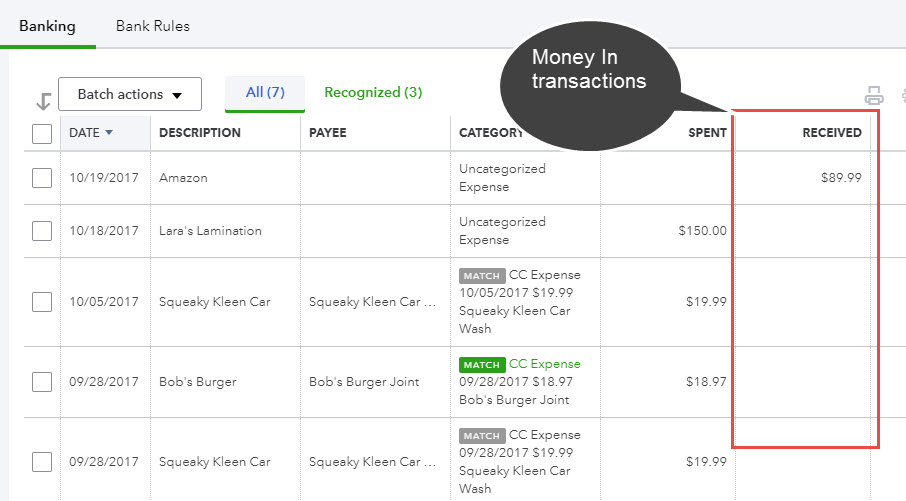
As a general practice, Money In banking transactions in QBO should generally be Matched. Let’s go over this concept.
Match – How to match Money In banking transactions in the QBO Banking Center
As I mentioned, it is best to match most Money In transactions into QuickBooks – especially if you invoice customers. Depending on your workflow and specific business needs, you may match Money In transactions in two ways (Method #1 or Method #2).
Money in Method #1
With this method, you will enter a customer invoice, receive payment, record a bank deposit and THEN Match the bank deposit to the corresponding transaction in the Banking Center.
Here is a video showing you how to enter an invoice, customer payment, and deposit:
You can also see the blog post that goes with this video here.
After you enter the invoice, customer payment, and deposit, you will Match the deposit in the Banking Center, as shown below:

Click “Match” on the right to match the transactions (or use Batch actions).
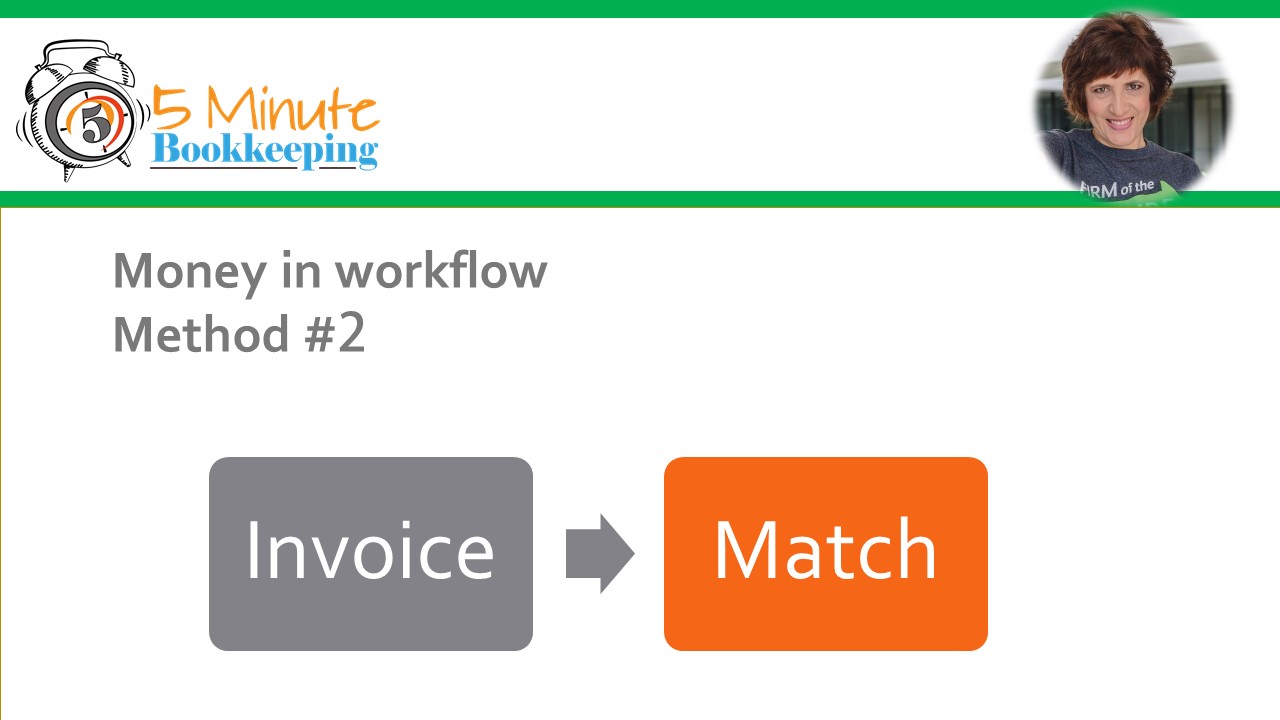
Money in Method #2
With this method, you will enter a customer invoice in QBO and THEN find a Match to the corresponding transaction in the Banking Center.
Let’s go over an example:
Let’s assume that we entered two invoices in QuickBooks for $108 and $300.
Let’s also assume that we received one payment for $408 dated 9/10/16, as shown below.

Click on the transactions to view its details. Then click Find Match.

The Match transaction window opens. Find the transactions that make up the deposit received and click to select them.
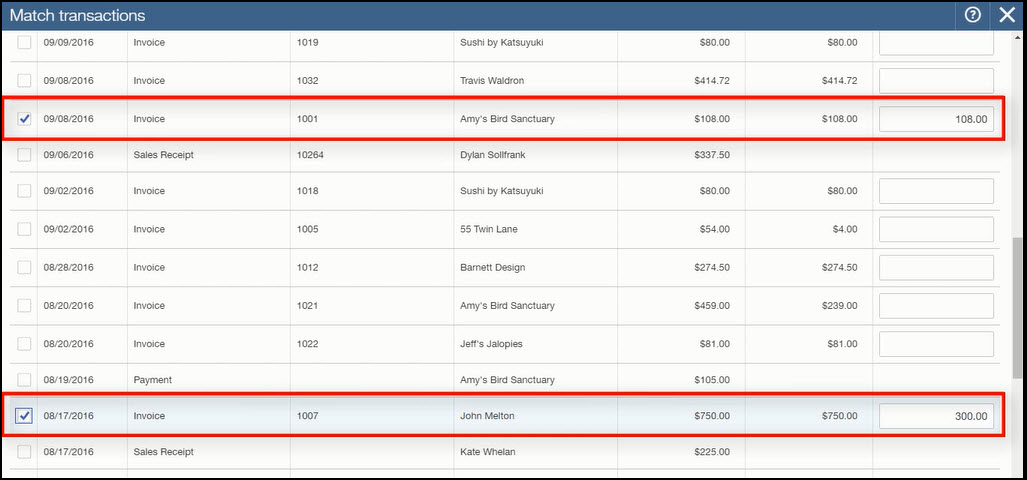
Scroll to the bottom and make sure that the difference is zero.
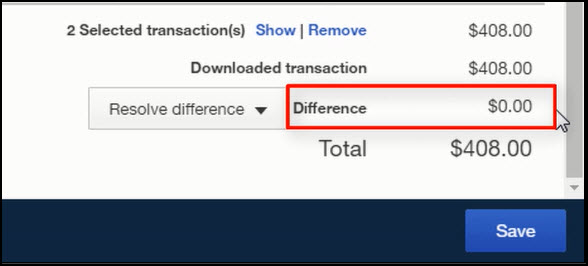
Click Save. The transaction is added to QuickBooks.
Which method do you prefer? I like Method #1 because you can be more proactive about tracking Accounts Receivable and you can make sure that all customer payments are accounting for. Others like method #2 because it requires less data entry. Pick the method that best suits your specific business needs.
Add – How to add miscellaneous Money In transactions
You may have transactions like credit card credits or refunds from vendors. We call these “Miscellaneous Deposits”. Let’s go through an example.
Let’s assume that you received a credit card credit from Amazon for $89.99.
First, you should know that credit card credits and refunds from vendors are recorded to the account category originally used to record the purchase.
In this case, the original purchase from Amazon was recorded to Supplies.
Click the transaction to view its details.
- Enter the vendor name (Amazon)
- Enter the account category originally used to record this purchase (Supplies)
- Click “Add”

The transaction will be added to QuickBooks after you click Add.
Other Money In transactions
It’s very tricky to write tutorials about QuickBooks Payments, Paypal, e-commerce and point-of-sale transactions. That’s because you generally need a customized workflow to record these transactions and also because it’s challenging to get sample data to show how to work with these types of Money In transactions.
I have included a tutorial for working with QuickBooks Payments in my paid course “Mastering QuickBooks Online Banking Transactions in 7 days.” For other types of Money In transactions, I recommend working with a QuickBooks Online expert who can help you customize these transactions to your specific workflows.
STEP 3 – Working with Transfers in the Banking Center

Did you know that you use Transfers in the QuickBooks Online Banking Center to record transfers between bank accounts and also to record credit card payments? I’ll show you the basics:
Let’s work through an example:
Let’s assume that you made a $10,000 transfer from your savings account to your operating (checking) account.

Next, let’s look at the checking (or operating) account.
Looking at the checking account, we can see that the money was received into the checking account.

So, what do you do now? You record the transfer.
Let’s stay in the checking account and click on the transaction to view more details.
Select Transfer.

Since this amount was received into the checking account we will select the savings account as the account category, because the money transferred into the checking account came from the savings account.
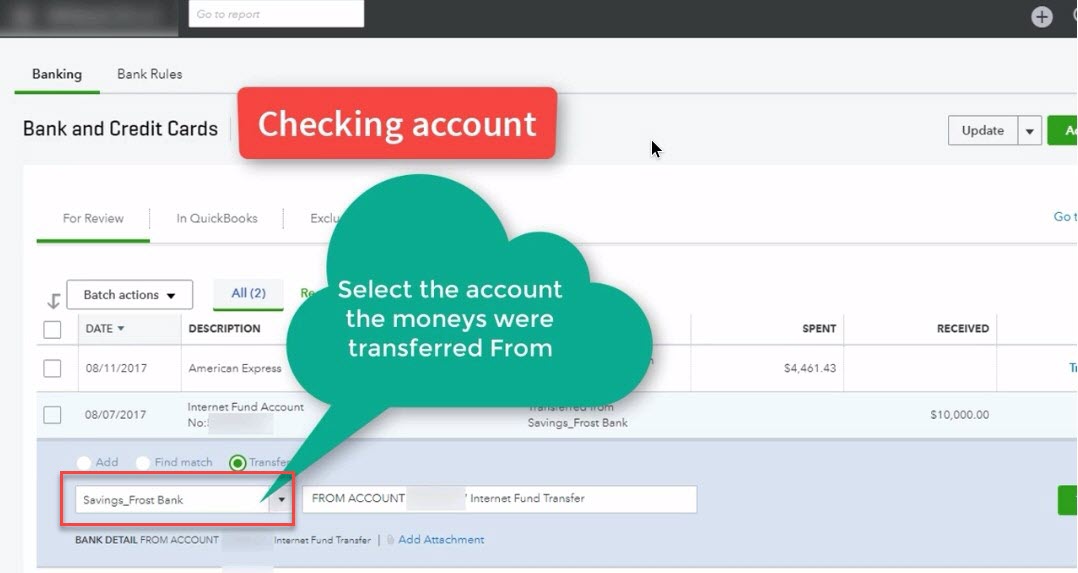
Once you have selected the savings account, click Transfer (the green button on the right).
The #1 mistake untrained users make with banking transactions in QuickBooks Online

The #1 mistake I see new QBO users make is that they start adding transactions into QBO without verifying that each transactions has a payee name and account category assigned.
Each and every downloaded banking transaction should have the correct vendor/company name and the account category (an account from the chart of accounts) assigned to it.
There should never be Uncategorized Expense or Uncategorized Income.
If QBO shows an expense as Uncategorized Expense or a deposit as Uncategorized income – it is only because QBO doesn’t know how to categorize the transactions. That means that you need to assign the proper expense or income category before accepting the transaction into QBO. Otherwise, your reports will show Uncategorized Income and Uncategorized Expense and you’ll have to spend a lot of extra time re-categorizing each transaction.

5 Minute Bookkeeping with QBO banking transactions
Tired of spending hours working on your bank feeds? Do you wish you had a blueprint you could use so that you could put a stop to your procrastination once and for all?
Doing 5 Minute Bookkeeping is super easy when you work with banking transactions. I recommend that you spend 5 minutes a day working with your banking transactions. You’ll be amazed at how quickly you will be done!
I’ve created the QBO bank feeds in 5 minutes cheat sheet for working with banking transactions in just 5 minutes a day. Click Here to claim the free cheat sheet. You can use the cheat sheet for easy reference. You’ll learn how to organize yourself and whether to add or match transactions. Just think, effortless bank feeds in just 5 minutes a day!
>>Click Here to claim the free cheat sheet<<
Reconciling bank and credit card statements in QuickBooks Online
You may be wondering, “aren’t you reconciling your banking transactions when you add and match transactions in QBO from the Banking window”? Actually, no. While you think that you are “reconciling” transactions, there is actually a formal process of reconciling transactions to a bank or credit card statement that is totally different. Here is a video showing how to reconcile bank and credit card statements in QuickBooks Online.
Recap
Congratulations! If you’ve made it this far then I know that you are serious about mastering banking transactions and reconciling accounts in QuickBooks Online. I have shown you:
- The 3-step process to organized yourself
- How to work with Money Out transactions in QuickBooks Online (add, match, batch)
- How to work with Money In transactions in QuickBooks Online (method #1 or method #2)
- How to add bank account transfers and credit card payments in QuickBooks Online
- The 5 Minute method for working with QBO bank feeds and free cheat sheet
- Reconciling bank and credit card statements in QuickBooks Online








Thanks for your post. I can’t figure out what to do with old uncleared items. Previous bookkeepers let them hang and some are several years old. Also, even more current items that do not have a reconciled check mark (although they appear in the ‘uncleared’ section of a reconciliation report), if I delete these ‘uncleared’ items, Quickbooks will warn me that I am deleting reconciled items and my reconciliation reports will be off. Any tips?
Hi Kathy. You have to be careful with old uncleared items. For newer items that are still uncleared, they may be duplicates. I normally look to make sure that they haven’t been already entered. If they were entered already, you can safely delete them. An item that has already been cleared should not appear in the bank reconciliation – not sure why you are seeing that in the reconciliation. For really old items, you need professional help. It’s too involved to explain in writing but they can be corrected – they need to be corrected in the current year but it depends on the type of transaction as to how it’s fixed. This is a good topic for a blog post and video tutorial.
Hello- An incorrect bank account was used to reconcile; I used account 10000 instead of the nested sub-account 10400; can I correct the reconciliations so that they map to the correct sub-account without undoing 5 months worth of bank reconciliations just to remap? Thanks!
Hi Melia. If you are referring to the bank reconciliation in QBO (you access it from the Gear Icon > Reconcile) then you should only be able to reconcile each bank account to its corresponding bank statement.
If you are referring to downloading banking transactions from your bank into QBO, then it is possible that you accidentally mapped the transactions to the wrong account in QBO. There accountant tools that Certified QuickBooks Online Proadvisors have to mass-reclassify the transactions. I recommend that you contact a local QuickBooks Online Proadvisor to help you at http://proadvisor.intuit.com/search/index-standalone.html#/
We have a rainy day account ( besides checking and debit) that has some money in it, but it does not have any transactions ( no checks in/out). Every month the ending balance is the same. Do you have to reconcile that account even if it has no transactions? If I have to reconcile, what do you enter for each month…for ex: beginning balance on 2014 Nov is $50,000 and the ending balance on Nov 2015 is still $50,000 .
Thanks
Sam
That’s a great question. If the account doesn’t have any activity, you can reconcile it once a year. The beginning balance and the ending balance would be the same – $50,000 as you indicate on your example.
I have a question, I just started for a new company and her year ending bank balance is of by $44,000. It is currently showing that the account has $57,000 in it, but the bank account should only be $13,000. I don’t have bank statements to go back and reconcile 2014 to make it correct. Is there a way for me to just correct the balance at the end 2014, and move forward to reconcile 2015? Please help!
Thank you
There is a way but I really don’t recommend it since it would involve recording a reconciliation discrepancy adjustment which will likely cause problems when you work on your tax return. You should try to get the bank statements for 2014 and reconcile the account.
I have used multiple versions of QuickBooks, but am new to the online version. When I try to reconcile the checking account, I find that I can not arrow down the transactions, nor can I hit enter to move from one transaction to the next.
Is there a way to customize QuickBooks to change this? I noticed that Intuit suggests printing out the reconciliation statement and matching that to the paper statement. I would prefer not to create more paper if it isn’t necessary.
Thank you!
Hi Nancy. Yes, it’s slightly more cumbersome to work with the QBO bank reconciliation. You’ll get used to it. There is not currently a way to change this.
Actually, we print out a paper statement many times or use a PDF of the bank statement and “annotate” check marks on it to do our bank reconciliations. We don’t like using paper either but we find that the old school method still works the best.
Hi Veronica,
I’m working with a business that has a corporate card with several individual cards for different employees as sub-accounts to the main card. When I link each individual card to the corresponding account online, QBO doesn’t allow me to set up the individual credit cards as subaccounts in QB. However, when I set the individual credit cards as sub-accounts first in QB, then I can reconcile each individual credit card, but not the master account. Because the payments are shown in the master account, and the cc charges in the individual card accounts, it makes it difficult to reconcile them individually. The master account balance keeps piling up in the negative, and the individual accounts have ever-increasing expense totals!
Is there a clean way to handle reconciling corporate credit cards that have sub-accounts like this?
Thanks in advance for your advice!
-Dawn
Very useful tips Veronica Wasek. I also looking for the quickbooks reconciling article. Good Job.