
I love helping e-commerce sellers tackle some of their biggest bookkeeping questions and challenges with QuickBooks Online. One of the basics that Shopify sellers need to know is how to record Shopify sales in QuickBooks Online. This can be tricky, as there are a lot of moving pieces, and you have to know where to get the information you need to enter into QBO. If you follow my content, you may know that I have specific advice if you are looking for an integration tool to streamline and automate your Shopify bookkeeping, including tips on what to watch out for and my recommended app (you can find out more about that in the closing section of this blog post). But today, I’m going to demonstrate how to record your Shopify sales in QuickBooks Online using a manual journal entry method. So let’s go ahead and get started by either clicking the linked video or reading on below.
Click on the video linked below to watch: How to record Shopify sales in QuickBooks Online
Step 1: Run Payout report in Shopify
To get started from the Shopify home screen, you will look for payouts. You’ll have to scroll down and then look to the right and find the payout schedule then select view all payouts.
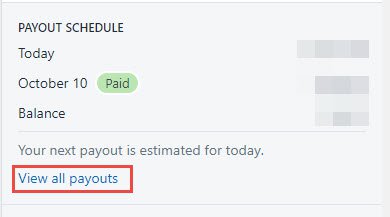
Next, you’ll see a list of all of the payouts in order by payout date.
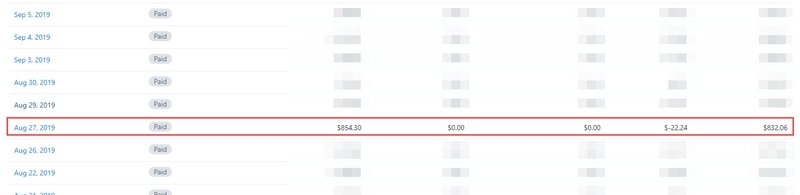
Next, select a specific date to view that payout in more detail.

In the example above, you’ll notice that you see a few items circled. You’ll see Total, which is the amount that was recorded into your bank account. You’ll also see Gross and Fees. You might also see Refunds or Adjustments on a specific payout date (these amounts are $0.00 in our example). And finally, at the bottom, you’ll see all of the different transactions that make up that payout.
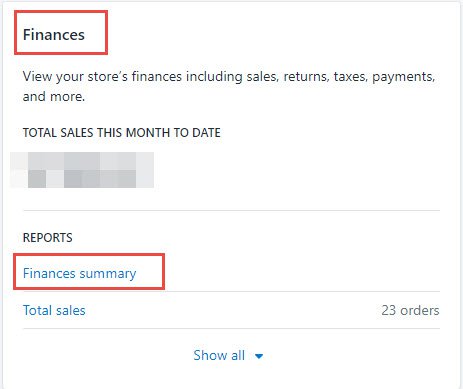
Step 2: Run Finances Summary report in Shopify
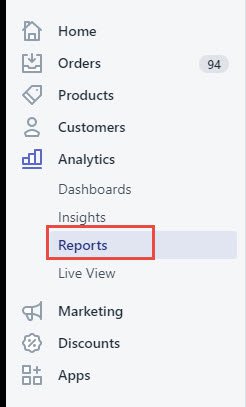
Next, from Shopify, go to Reports, then scroll down until you see Finances and click on Finances Summary.
Below, you’ll see where you need to enter transaction dates to get the correct report.
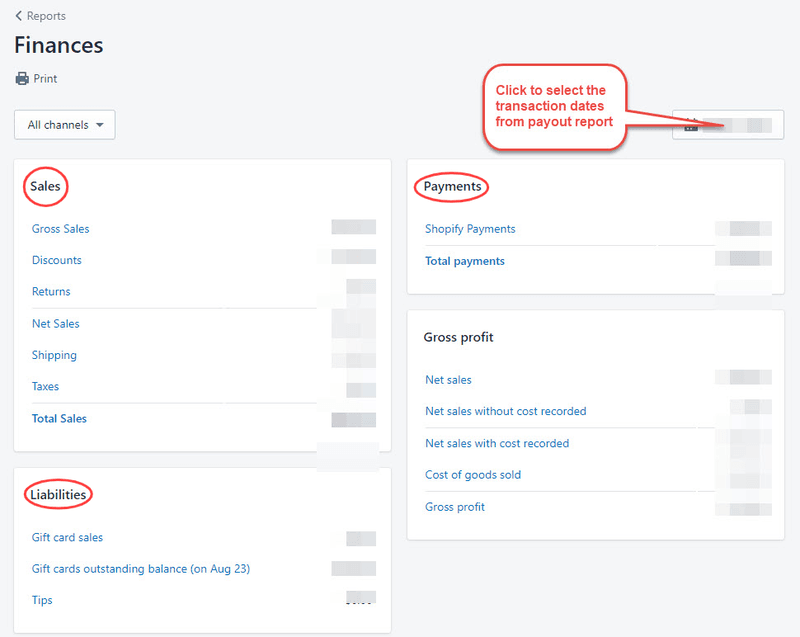
After entering the date range, we’ll see the Finances report showing sales, liabilities, and payments. Now, keep in mind that the amount that was received in the bank account will likely be different from the amount on the finance report. The amount of the Shopify payout is total Shopify payments, minus fees, plus or minus adjustments. That’s what you actually see as your payout in your bank account.

This is where it can get a bit complicated. There are some adjustments you need to make to enter the amount into QBO. So, how do you create a journal entry to reflect all of that? Let’s take a look.
Step 3: Create a Journal Entry in QuickBooks Online to record Shopify Sales details
In the example below, I have picked up the first group of transactions from the Finances report (from Step 2 above), which includes sales income, discounts, shipping income, sales tax payable, and Shopify fees. I also picked up the Shopify clearing amount from the Payout report (from Step 1 above). This is the amount that was actually deposited in the bank account from Shopify clearing.
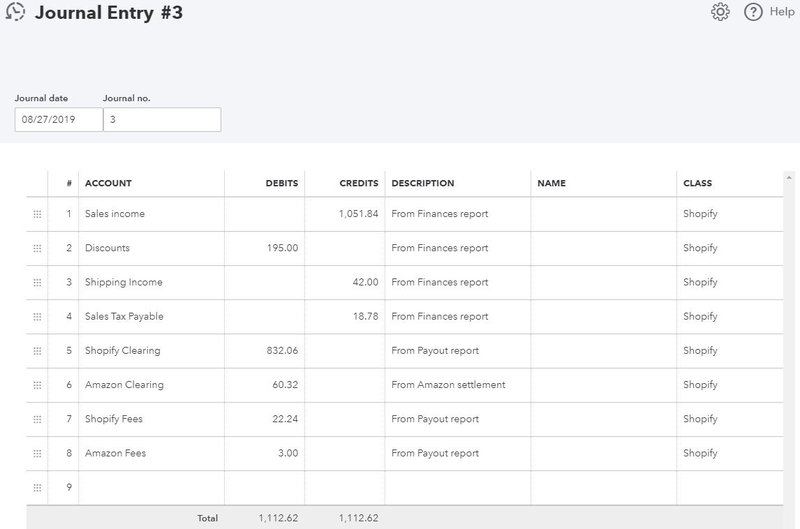
So, you can see in the example above how I’ve laid out the manual journal entry to account for all these adjustments found in the Finances report and arrive at a transaction that will match the incoming bank feed item.
Step 4: Record Amazon and other payment processors
Finally, you may be wondering about the Amazon Clearing and Amazon Fees recorded in my example journal entry above. Let’s discuss where I got those amounts, and what you need to consider with Amazon Pay other payment processors as well.
Shopify allows you to receive payments from Shopify payments, from PayPal, from Amazon, and other payment processors. It gets really tricky here because the information we can get directly from Shopify is specifically about Shopify payments. We’re not able to pick up PayPal fees or Amazon fees from Shopify, so we have to get those directly from those payment processors.
The main thing to consider is that there are a lot of moving pieces and a lot of different places where you have to pick up income, deductions, and fees for each payment processor, as shown in the infographic below.

Ultimately, all that information needs to come over into QuickBooks and be able to reconcile to the amounts that you’re receiving into your bank account.
Closing
You might be thinking, “Hey, this is a lot of work!” and I agree. It is a lot of work, and it can get fairly complicated. Give this journal entry method a try, or you may want to explore options for integrating Shopify and QuickBooks Online to automate and streamline this process. You’ll find my recommendations in a related blog post linked here: Integrating QuickBooks Online with Amazon and Shopify using A2X.
I hope this blog post helps you understand how to record Shopify sales in QuickBooks Online using a journal entry method. If you are looking for more tips for e-commerce accounting, click here for a complete list of my e-commerce related blog posts.
If this content is helping you, make sure that you comment and share, and make sure to visit often!