Daisy Flowers has just finished off with a long and productive year, but now, she’s worrying about tax time, again. She knew that she needed to catch up, and so she read and followed the steps behind How to do a full year worth of bookkeeping when you need it done yesterday, part 1 and part 2. But, despite doing everything she could to catch up, Daisy is still desperate for guidance. She wants to make sure that she didn’t miss anything important, but she doesn’t know where to begin. What Daisy needs, is a process. And today, I’m going to share with you and Daisy, the Ultimate QuickBooks Online Year End Checklist.
What is the Ultimate QuickBooks Online Year End Checklist? It’s a list of important steps that you need to take before finalizing your books for your tax return. So, follow along, as I go through each step of the checklist.
#1: Make sure all transactions have been recorded
First, you must make sure that all transactions have been recorded in QuickBooks for the previous year.
Go to the Banking Center and make sure there are no banking transaction dated for the previous year. If your banking transactions are all up-to-date, then congratulations! All the necessary information needed to reconcile has already been entered.
![]() However, if there are still banking transactions left over from the previous year, then the remaining banking transactions will need to be correctly added to QBO.
However, if there are still banking transactions left over from the previous year, then the remaining banking transactions will need to be correctly added to QBO.
To learn more about properly adding and categorizing banking transactions, here are some valuable resources:
- Our most popular blog post: Reconciling Accounts in QuickBooks Online, which takes you on a journey through the QBO banking center and shows you how to enter different types of transactions.
- Our master class: Mastering QuickBooks Online Banking Transactions in 7 Days. This is a master class full of step-by-step video tutorials for working with QBO banking transactions.

#2: Reconcile Bank and Credit Card accounts
Reconciling bank and credit card accounts is extremely important because each transaction entered in QBO must in-fact be an actual transaction. And, the only way to verify transactions, is by using outside documentation, like a bank statement.
Before you begin your reconciliations, obtain bank and credit card statements from your bank or financial institution. You will need them in order to reconcile your bank and credit card accounts correctly.
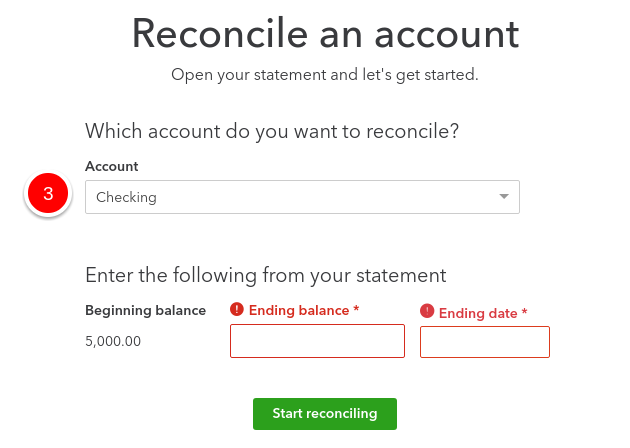
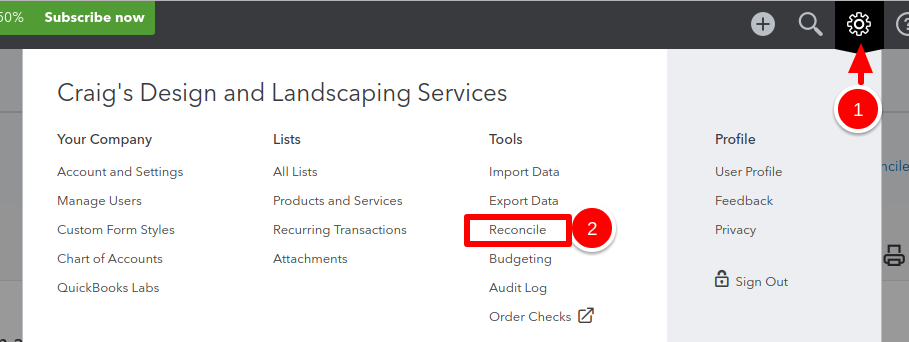
To begin a reconciliation:
1. Go to the Gear Icon.
2. Select Reconcile.
![]()
3. Select the bank or credit card account you wish to reconcile, be sure to enter the Ending Balance* and Ending Date* (These will come from your bank or credit card statements).
 Here’s a video tutorial on how reconcile and bank or credit card accounts:
#3 Review for Uncleared Transactions
Once finished reconciling, be sure to review for uncleared (unreconciled) transactions.
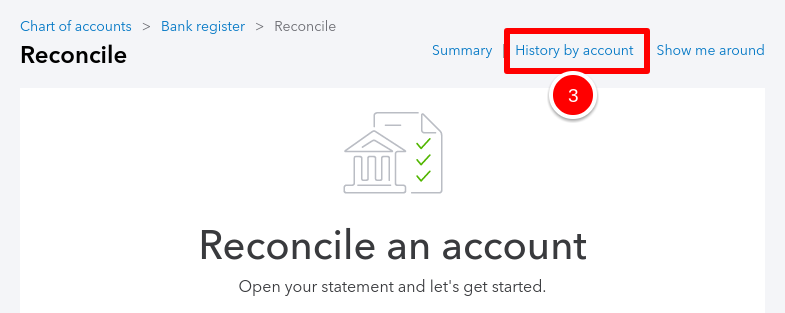
Start by opening your last bank or credit card reconciliation.
1. Select the Gear Icon.
2. And then select Reconcile.
3. Then, select History by account.
4. Select the Bank or Credit Card account you want to view the reconciliation report for.
5. Look for the most recent reconciliation.
6. Select View report.
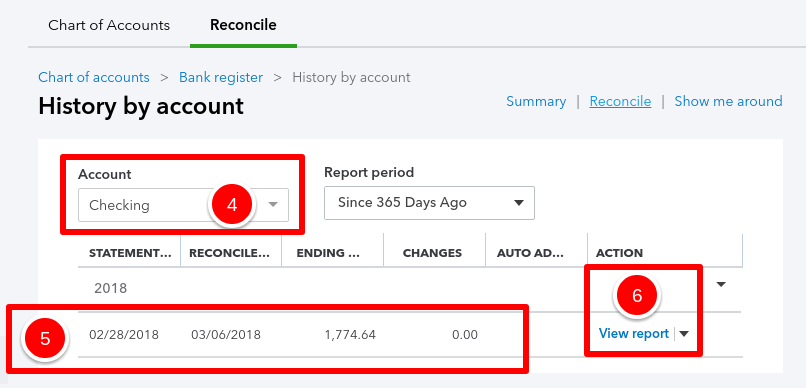
You should then see a Reconciliation Report.
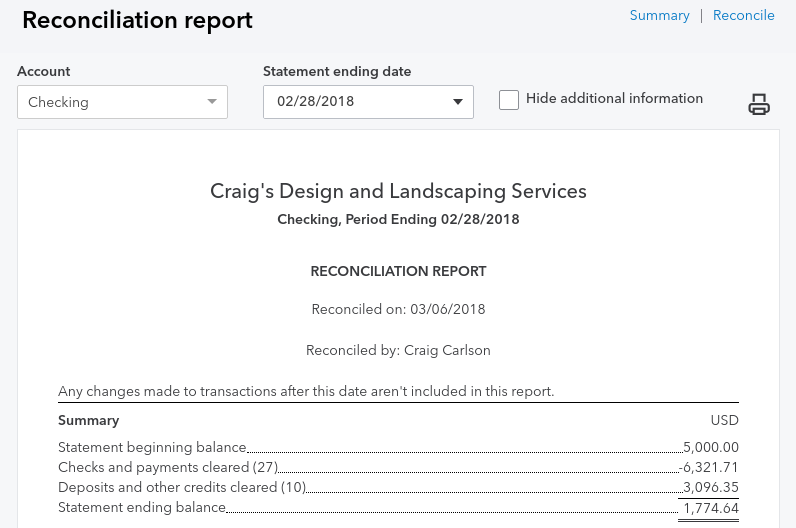
In the Reconciliation Report, look for the sections, titled, Uncleared checks and payments and Uncleared deposits and other credits. Review the transactions in these sections. Old or uncleared transactions may be duplicates, or just incorrectly-entered transactions.
![]()
If you have duplicate or incorrectly-entered transactions in QBO, then they will need to be corrected. To learn more about making corrections to already-existing transactions check out this blog post: How to edit, void, and delete transactions in QuickBooks Online.
#4: Review Undeposited funds
Start by opening the Record Deposits window by:
- Selecting the Quick Create (+) icon.
- And, then selecting Bank Deposit.
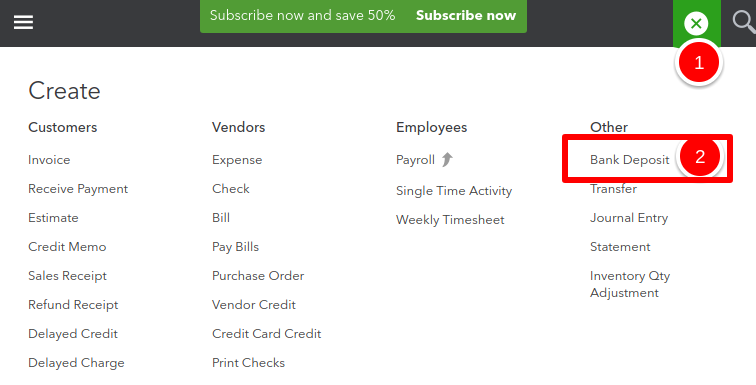
Review the payments under “Select the payments included in this deposit”.

There should be no old or outstanding payments in this section. If there are any old outstanding payments, then they will need to be corrected.
To learn more about cleaning up old items in undeposited funds – check out this blog post: Unraveling the mysteries of the QuickBooks Online Undeposited Funds account.
#5: Review the Profit and Loss Report
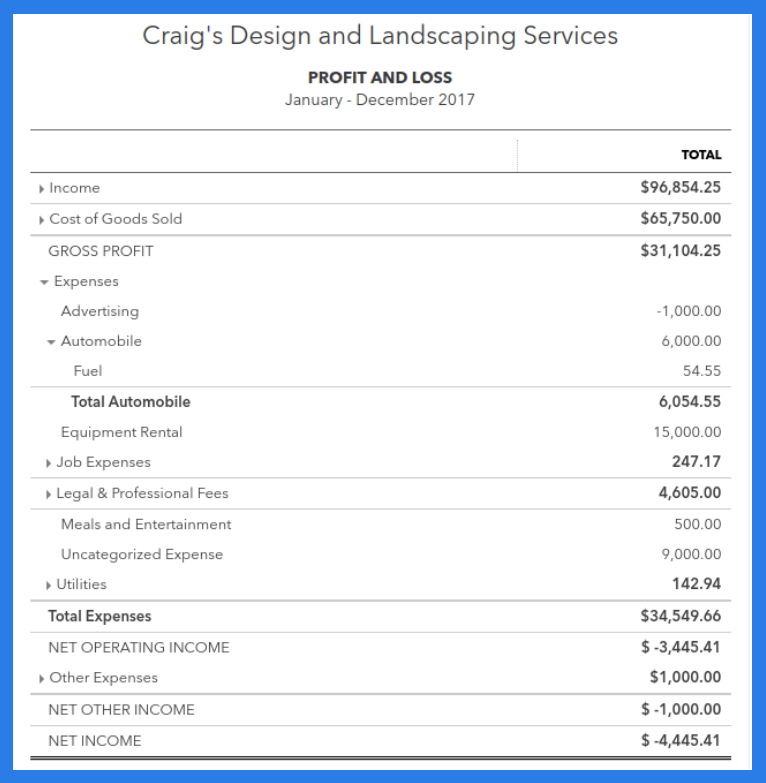
When reviewing the Profit and Loss report, make sure that the report period is for Last Year. 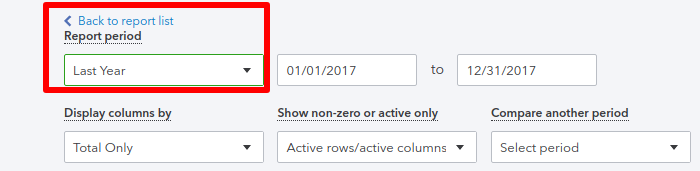
As you and review the Profit and Loss, be on the lookout for income and expense accounts with negative or unusual balances. If you happen to notice, that some expenses are categorized incorrectly, then you may want to check out this blog post: How to fix expenses entered to the wrong account in QBO.
[bctt tweet=”As you review your Profit and Loss report, be on the lookout for income and expense accounts with negative or unusual balances.” username=”5MinBookkeeping”]
Here are some examples of what to look for when reviewing the Profit and Loss report:
- Make sure there are no income accounts with negative or unusual balances.

- Make sure there is no uncategorized income.

- Make sure there are no expense accounts with negative or unusual balances.
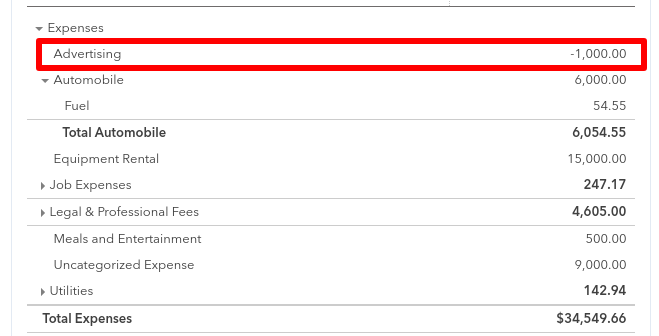
- Make sure there are no uncategorized expenses.
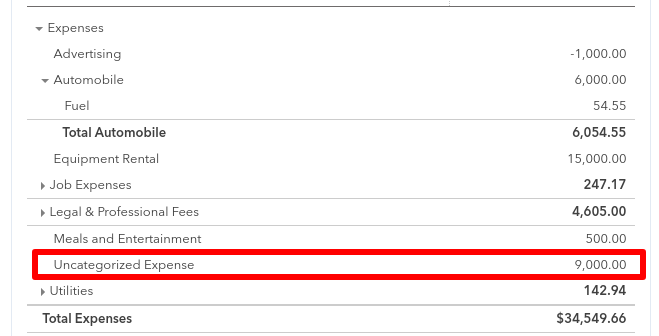
- Verify that all miscellaneous expenses are under $500.

#6: Review the Balance Sheet
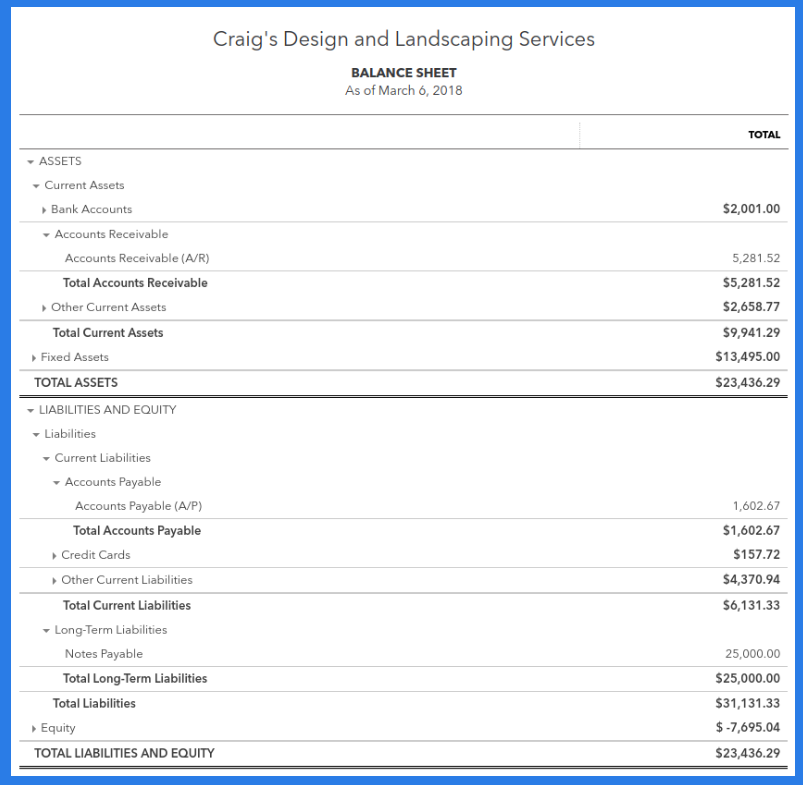
When reviewing the Balance Sheet, make sure that the report period is for Last Year.
As you review the Balance Sheet, focus on the Fixed Asset accounts like: automobiles, computer equipment, furniture, factory machinery, etc. 
Look at the transactions affecting these fixed assets accounts, and make sure there are no transactions under $2500.00. Transactions under $2500.00 are too small to be capitalized as a fixed asset, and would better be categorized as an expense. ![]()
In addition to fixed asset accounts, review the other balance sheet accounts for negative or unusual balances. 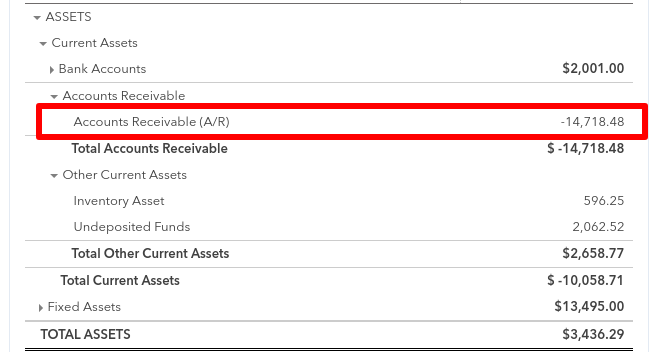
Unusual balances, such as a negative balance in Accounts Receivable or Accounts Payable, may be a sign that you need further assistance. Consult with a QuickBooks Online Pro-Advisor for the best course of action.
#7: Review the Accounts Receivable Aging Summary
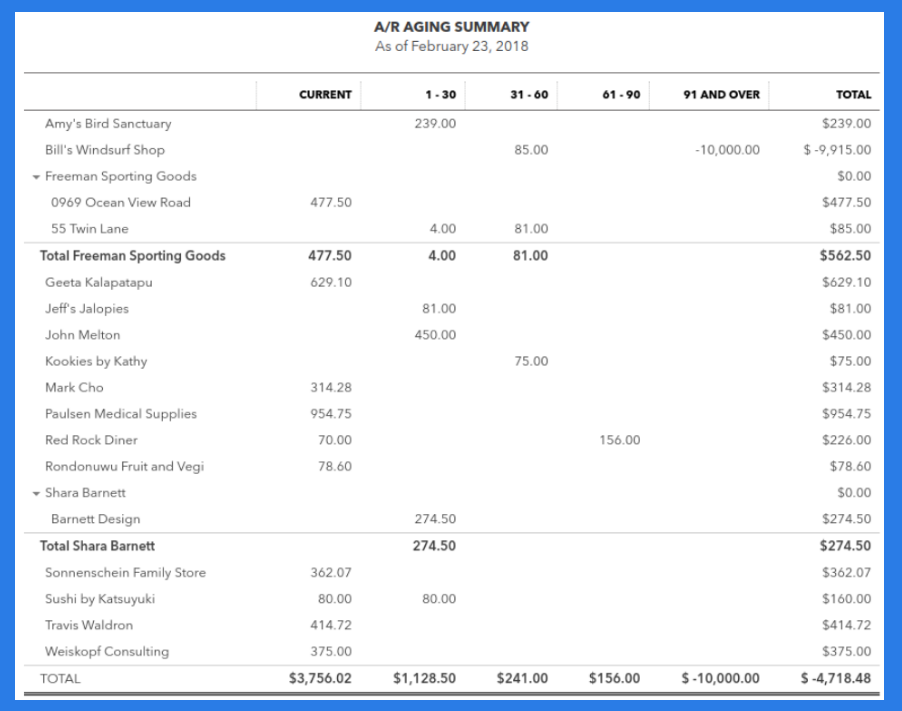
The Accounts Receivable Aging Summary shows the unpaid balance from each customer grouped by days past due.
Use this report to review for old / uncollected items which are more than 90 days past due. Any unpaid customer balance which is more than 90 days past due, should be reviewed. You may need to write off uncollectable customer balances.
#8: Review the Accounts Payable Aging Summary
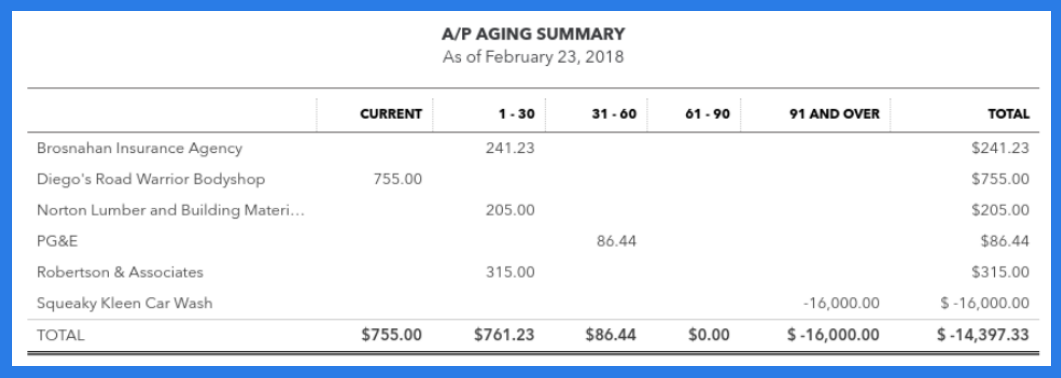
The Accounts Payable Aging Summary shows the balances of unpaid vendor bills grouped by days past due.
Use this report to review for old / uncollected items which are more than 90 days past due. Any unpaid vendor balance which is more than 90 days past due, should be reviewed.
Closing
After going through the Ultimate QuickBooks Online Year End Checklist, Daisy felt like she had a pathway toward being prepared for tax time. One-by-one, she completed each step. Having the checklist, gave Daisy the confidence to know that she didn’t miss anything important. Now, I encourage you to take some time and go through the Ultimate QuickBooks Online Year End Checklist. You’ll learn about the most important steps to finish off another great year.
Do you have questions about the Ultimate QuickBooks Online Year End Checklist? Join our Facebook group.