
Bob, is applying for a small business loan, but Bob’s bank wants a clean set of financial reports first. Bob is worried because he’s never reviewed his transactions in QuickBooks Online, and he doesn’t even know whether his financial reports are clean or not. Bob’s frustration is shared by many inexperienced QuickBooks Online users because they don’t know where to start. After all, QBO has so many links, features, and shortcuts, that it can be overwhelming to some new users. But fear not, because in this blog post, I’ll show you how to review transactions in QuickBooks Online with an easy-to-follow 6-step method.
Why should you review transactions in QuickBooks Online?

Although a transaction may have been reconciled and it may be a valid transaction, it may be categorized to the wrong account. For example, you may see that transactions were categorized to “uncategorized income” or “uncategorized expenses”. Transactions may be categorized to “computer expenses” when in fact they may be “internet expenses”. You may have transactions categorized as “legal expenses” when in fact they are “accounting expenses”. Transactions should be categorized to the correct accounts in order to get meaningful reports out of QuickBooks Online.
[bctt tweet=”Transactions should be categorized to the correct accounts in order to get meaningful reports out of QuickBooks Online.” username=”5MinBookkeeping”]
Before reviewing transactions in QuickBooks Online

Several tasks must be completed before you begin reviewing your transactions in QBO.
These tasks include:
- Making sure all transactions have been entered in QBO
- Making sure all bank and credit card accounts have been reconciled
If you need additional help completing these two tasks, then check out our most popular blog post.
6 Step Method for Reviewing Transactions
After you enter all of your transactions and reconcile your bank and credit card accounts in QuickBooks Online, you should perform a very important step – that is, to review the activity in the accounts to make sure that transactions are correctly entered and categorized correctly.
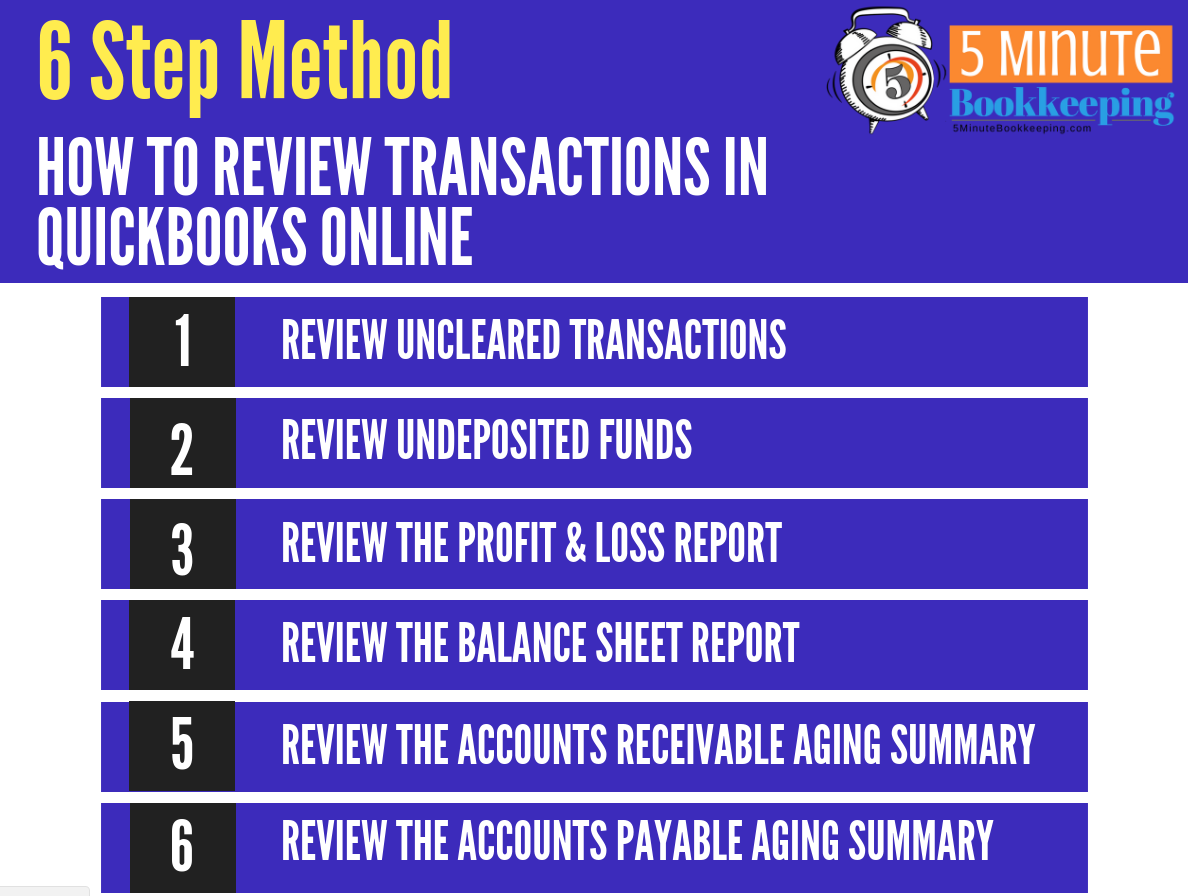
Here is a list of steps you can use to review your transactions. Don’t worry, I’ll go over step in greater detail.
#1 Review for Uncleared Transactions
After reconciling your bank or credit card account, be sure to review for uncleared (unreconciled) transactions.
Start by opening your last reconciliation.
- Select the Gear Icon.
- And then select Reconcile.
![]()
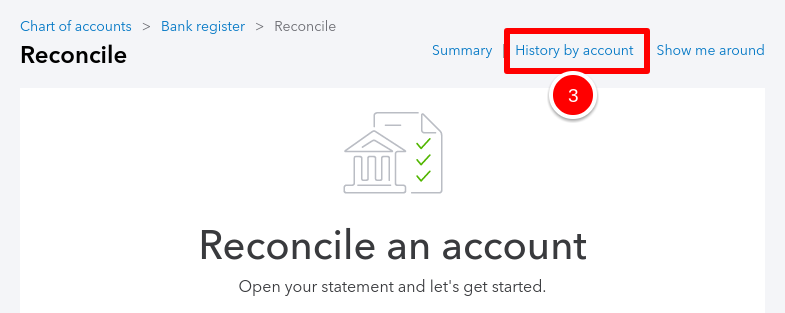
- Then, select History by account.
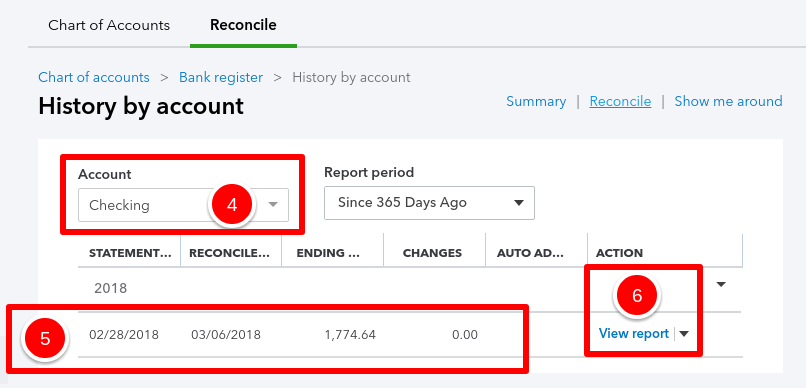
- Select the Bank or Credit Card account you want to view the reconciliation report for.
- Look for the most recent reconciliation.
- Select View report.
You should then see a Reconciliation Report.
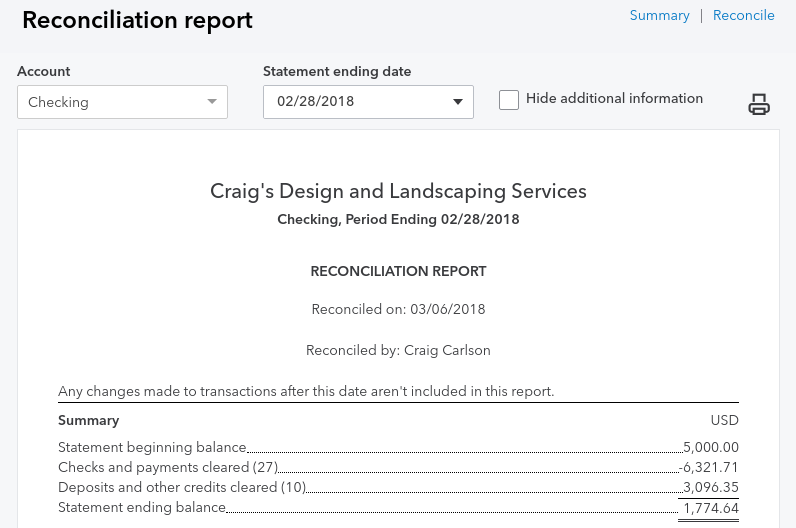
In the Reconciliation Report, look for the sections, titled, Uncleared checks and payments and Uncleared deposits and other credits. Review the transactions in these sections. Old or uncleared transactions may be duplicates, or just incorrectly-entered transactions.
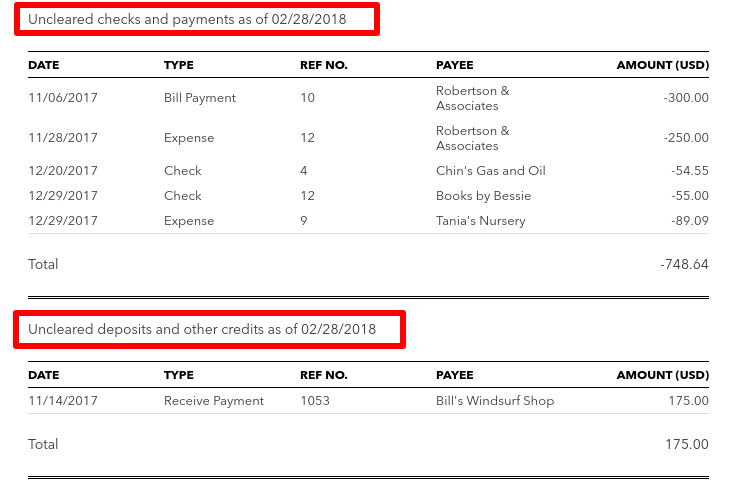
If you have duplicate or incorrectly-entered transactions in QBO, then they should be corrected. To learn more about making corrections to already-existing transactions check out this blog post: How to edit, void, and delete transactions in QuickBooks Online.
#2: REVIEW UNDEPOSITED FUNDS
To review Undeposited funds, start by opening the Record Deposits window.
- Select the Quick Create (+) icon.
- And, then select Bank Deposit.
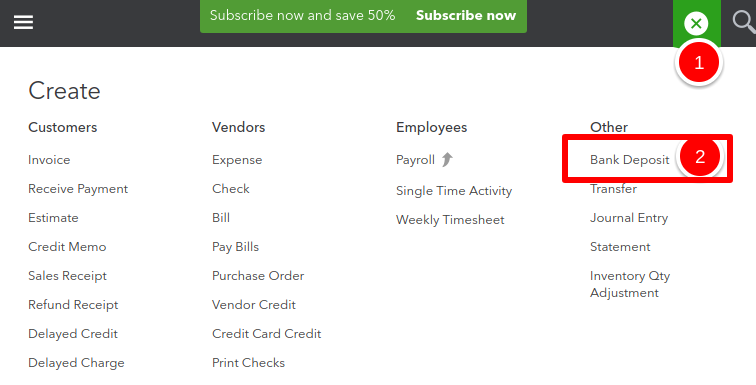
Review the payments under “Select the payments included in this deposit”.
There should be no old or outstanding payments in this section. If there are any old outstanding payments, then they will need to be corrected. To learn more about undeposited funds – check out these handy blog posts:
- Unraveling the mysteries of the QuickBooks Online Undeposited Funds account.
- How to clean up Undeposited Funds in QuickBooks Online.
#3 REVIEW THE PROFIT & LOSS REPORT
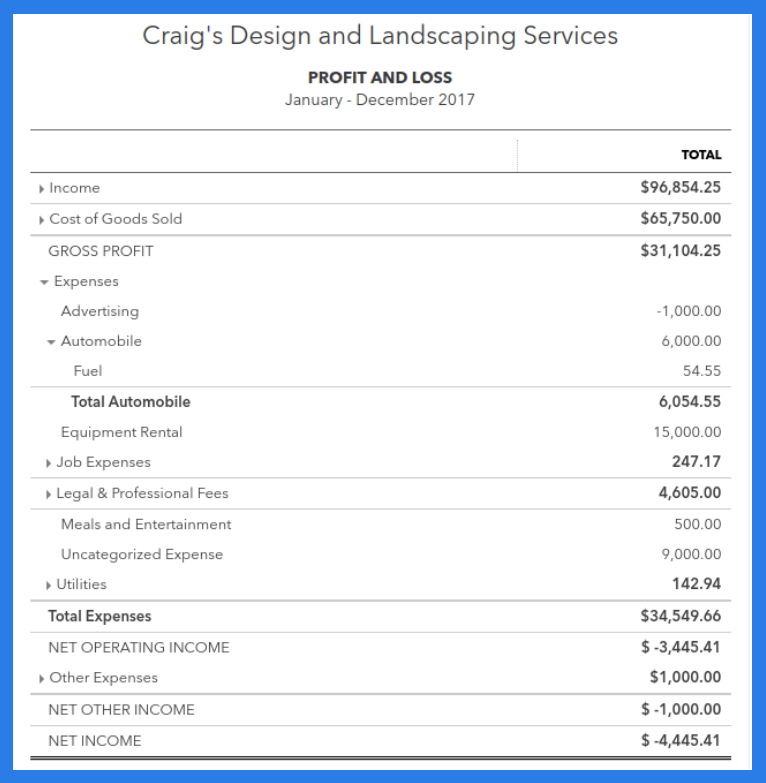
Run a Profit & Loss report for the period (year, month, etc). Review the amounts on the Profit & Loss Report. Do any amounts look unusually high? Do any numbers look unusually low? Are there large negative amounts that shouldn’t be there?
Here are some examples of what to look for when reviewing the Profit and Loss report:
- Make sure there are no income accounts with negative or unusual balances.
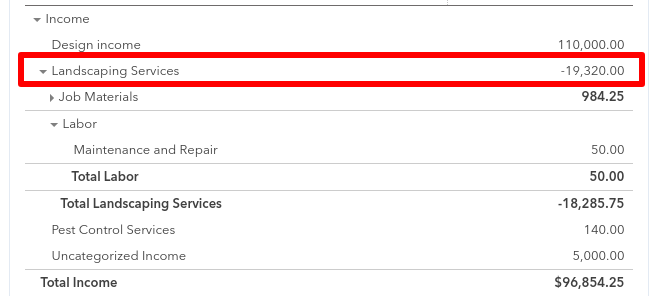
- Make sure there is no uncategorized income.
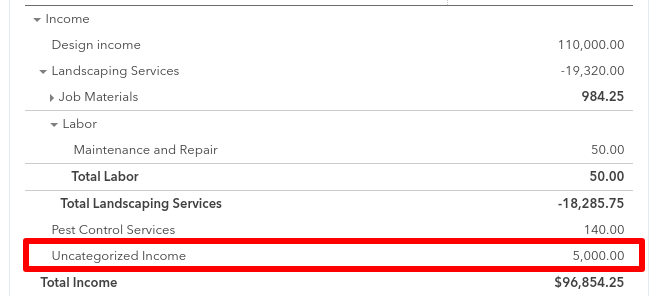
- Make sure there are no expense accounts with negative or unusual balances.
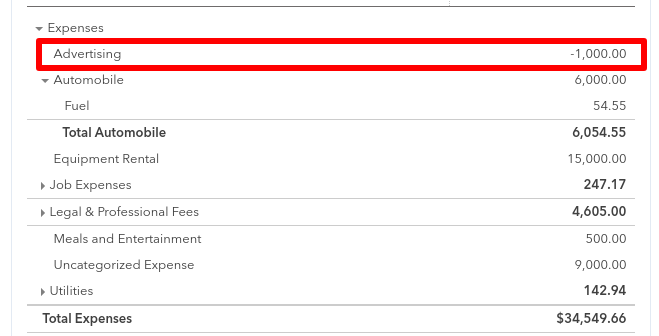
- Make sure there are no uncategorized expenses.
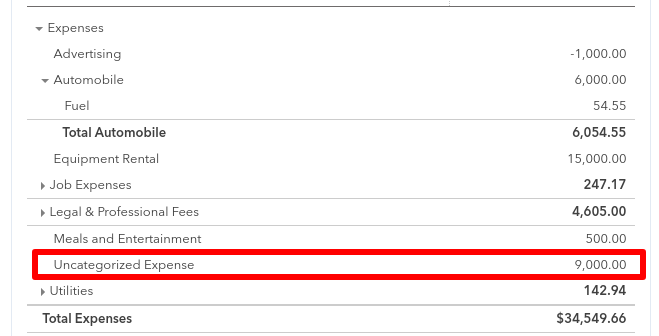
- Verify that all miscellaneous expenses are under $500.

For any amounts that look too high, too low, or wrong – zoom into the transaction details to see if any transactions are entered to the wrong account. Make corrections as needed by changing the account assigned to the transaction. (Caution – be careful not to delete transactions – especially if they have been reconciled).
If you’re not sure whether the amounts on the Profit & Loss make sense or if you’re not sure how to fix transactions – it may be time to consult a QuickBooks Online expert or your accountant.
#4 REVIEW THE BALANCE SHEET REPORT
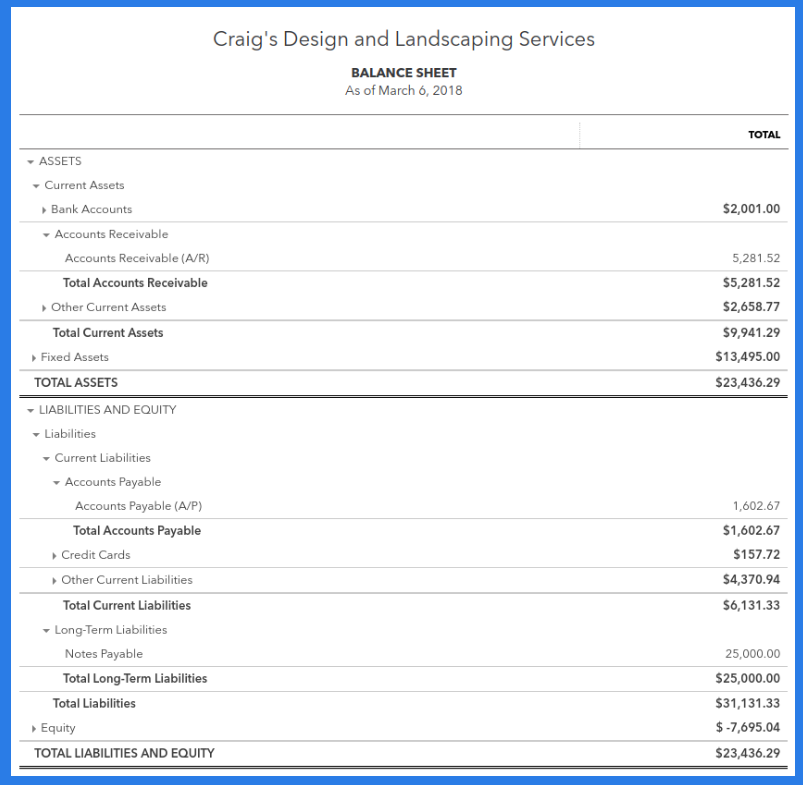
Run a Balance Sheet report for the period end. Review the amounts on the Balance Sheet. Do any amounts look unusually high? Do any numbers look unusually low? Are there large negative amounts that shouldn’t be there? You can also view details of transactions by zooming into each amount.
Here are some examples of what to look for when reviewing the Balance Sheet report:
Look for Fixed Asset accounts like: automobiles, computer equipment, furniture, factory machinery, etc.
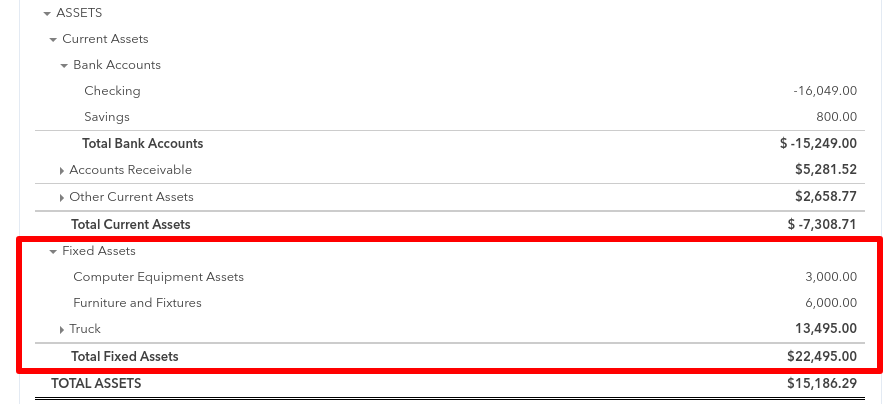
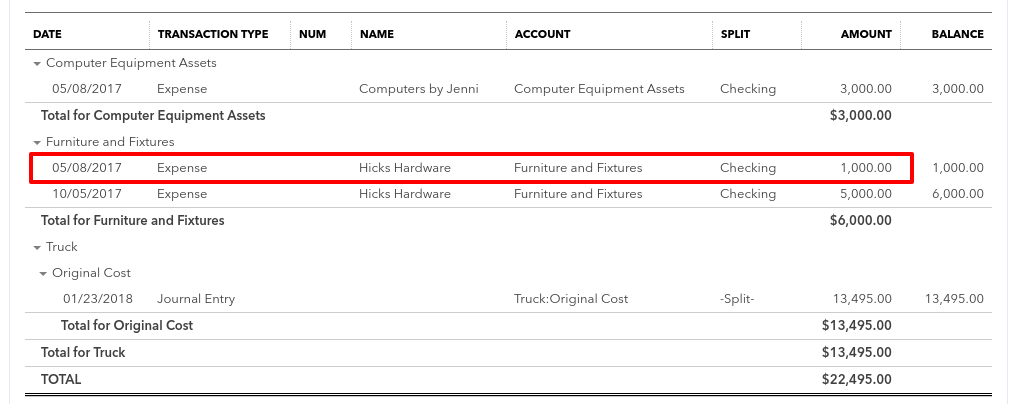
Look at the transactions affecting these fixed asset accounts, and make sure there are no transactions under $2500.00. Transactions under $2500.00 are too small to be capitalized as fixed assets, and would better be categorized as regular expenses.
In addition to fixed asset accounts, review the other balance sheet accounts for negative or unusual balances.
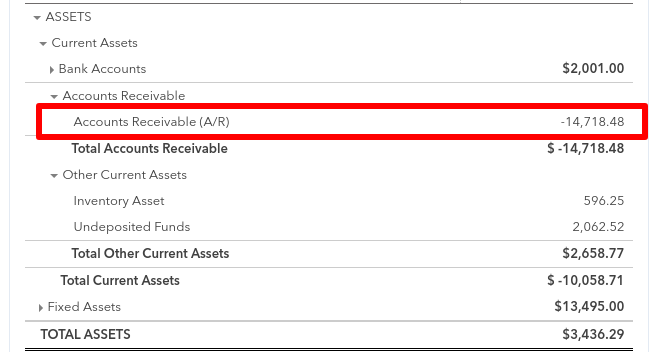
Unusual balances, such as a negative balance in Accounts Receivable or Accounts Payable, may be a sign that you need further assistance. Consult with a QuickBooks Online Pro-Advisor for the best course of action.
#5: REVIEW THE ACCOUNTS RECEIVABLE AGING SUMMARY
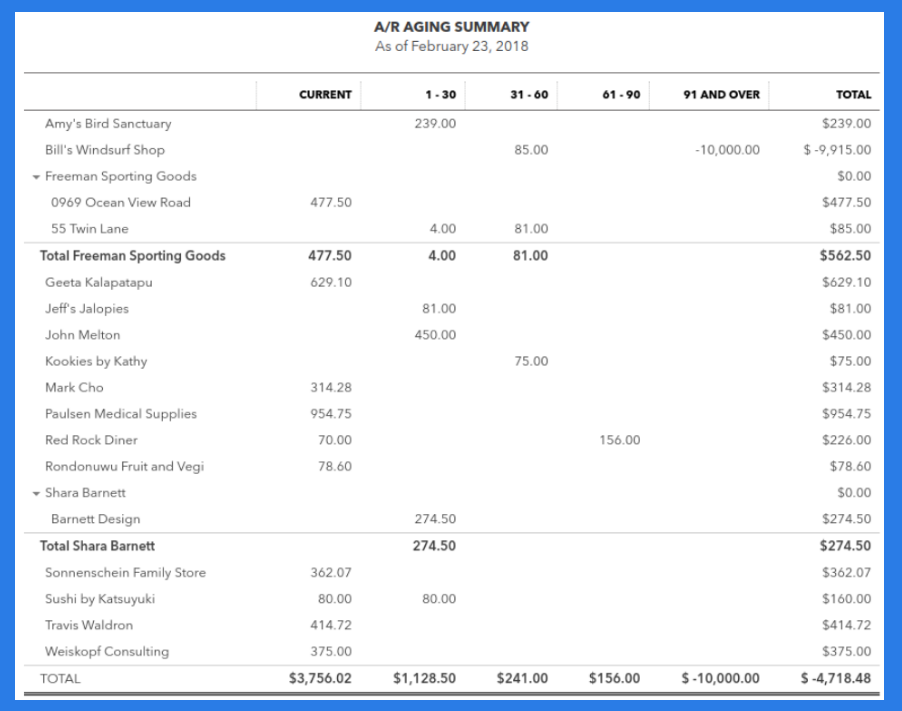
The Accounts Receivable Aging Summary shows the unpaid balance from each customer grouped by days past due.
Use this report to review for old / uncollected items which are more than 90 days past due. Any unpaid customer balance which is more than 90 days past due, should be reviewed. You may need to write off uncollectable customer balances.
#6: REVIEW THE ACCOUNTS PAYABLE AGING SUMMARY
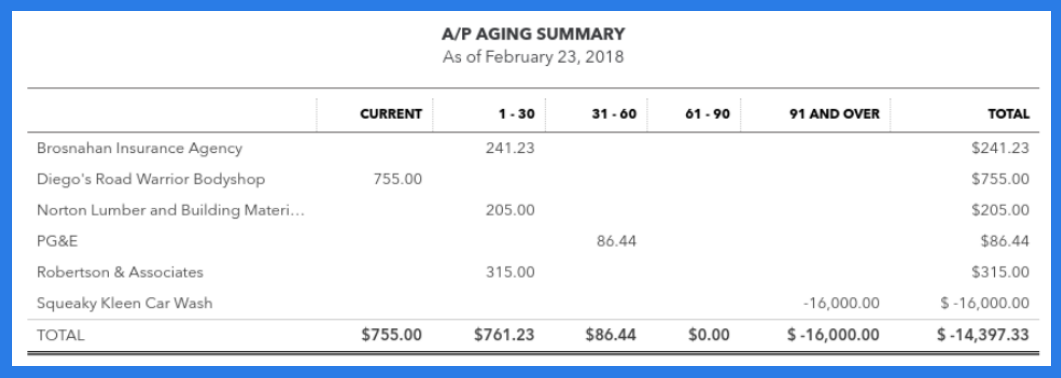
The Accounts Payable Aging Summary shows the balances of unpaid vendor bills grouped by days past due.
Use this report to review for old / uncollected items which are more than 90 days past due. Any unpaid vendor balance which is more than 90 days past due, should be reviewed.
Closing
Remember, knowing how to review transactions in QuickBooks Online is an important part of ensuring that your QuickBooks Online data is staying clean. Clean data will allow you to run reports that are meaningful. Meaningful reports will give you critical insight into your business.




Your explanations are clear and easy to understand. Thank you for all of your online videos and emails. It is appreciated very much.