Hello again. I’m back with another QuickBooks Online tutorial. This time I will cover how to enter invoices in QuickBooks Online.
What’s an invoice in QBO?
An invoice in QBO refers to the sales invoices that you send to your customers. It does not refer to the invoices that a vendor sends you – those are called “Bills” in QuickBooks Online.
Enter an invoice in QuickBooks Online
To enter an invoice, click on the Create (+) menu at the center top and select Invoice.
The Invoice window will open.
- Enter the customer name or select it from the customer list.
- Enter the customer’s email address.
- The customer’s billing address will be automatically filled in if it’s already entered in the customer’s record in the Customer Center.
- Enter the payment terms (the date when the customer is supposed to pay you).
- Enter the invoice date.
- The due date of the invoice will calculate automatically based on the payment terms.
Enter products and services
7. Enter the corresponding product or service you are invoicing your customer. See my tutorial on How to Set Up the Products and Services List in QuickBooks Online.
8. Enter or edit the description
9. Enter the quantity sold (this may be quantities or hours).
10. Enter or edit the rate.
11. QBO will do the math for you to calculate the amount (quantity x rate).
12. If you collect sales tax, then check the sales tax box.
Verify sales tax and enter a message to be displayed on the invoice
13. Enter a message to be displayed on the invoice – like “Thank you for your business!”
14. Verify that you are using the correct sales tax rate.
15. Once again QBO does all the math for you. The balance due is the amount that the customer owes you.
How to attach a file to an invoice in QuickBooks Online
Do you need to attach documents to an invoice so you can send them to your customer? No problem! You can attach any PDF file to an invoice. You can send contracts, timesheets, receipts, etc. Just drag and drop files into the Attachments window.
Click Save and Send at the bottom right to email the invoice (and attachments) to your customer.
Email an invoice to a customer
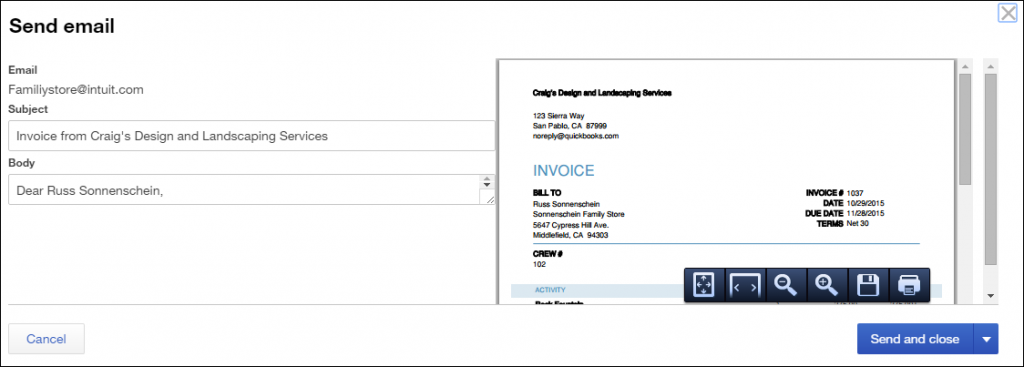
After you click Save and Send, the Send Email window will open. On the left, you will see your customer’s email address, the subject line on the invoice, and the body of the message. On the right, you will see a preview of what the invoice looks like.
Click Send and Close to email the invoice to your customer.
Tips
[bctt tweet=”Cash is king in business.”] Invoice customers as soon as work is completed while customers are still happy with your services. They’ll pay you sooner.
I recommend that you use QuickBooks Payments so that your customers can pay you online. I use QuickBooks Payments and I love it. My customers can click directly on the invoice I email to them and they can pay me right away.
If you provide services, consider invoicing customers in advance. This also helps to keep a healthy stream of cash coming in.
Make sure that your invoices include a due date. Showing a due date on your invoices helps you to get paid on time.
Final words
Congratulations! You have learned how to enter invoices in QuickBooks Online. If you find these tutorials helpful, please share these posts with others. I would really appreciate it also if you subscribe to our blog so that you can get all the latest tutorials and tips. Have a great week!


