Hi again and thanks for keeping up with our blog posts and for your kind words. I want to say hi to Stephen. He reached out to me via LinkedIn – Hi Stephen! In this post, I have a tutorial and video for you on how to email sales invoices in QuickBooks Online. You would think that it’s simple but there are a few tips and tricks I need to show you.
A story
As you know, I grew up without computers. When I was in High School, I had a part-time job as an office clerk at a company helping with “typing” and filing. I used to type invoices and envelopes on a typewriter. I still remember the sound that the typewriter would make as I would strike each key on the keyboard.
Back then, if you made a mistake you would have to use Liquid Paper or correction tape to fix errors. I can’t imagine how long it took for that company to get paid by their customers. Think about it. It would take us a day to type all the invoices, a day for the boss to review them, and then we would fold the invoices, stuff them in envelopes, add postage, and mail the invoices.
The customer would receive the invoice and enter it in their accounting system. Then they would have to type a check and an envelope so that they could mail the check to us. Wow! That’s a lot of work!I really don’t miss those days. It’s amazing now how quickly you can prepare and email an invoice and even get paid electronically. That’s 5 Minute Bookkeeping in action!
How to email sales invoices in QuickBooks Online
Here is the video showing step by step how to email sales invoices in QuickBooks Online.
Now, here is the step by step tutorial:
I’ll assume that you have already entered an invoice. In our example, here is an invoice for our customer “Cool Cars.” Click Save and Send to email the invoice.

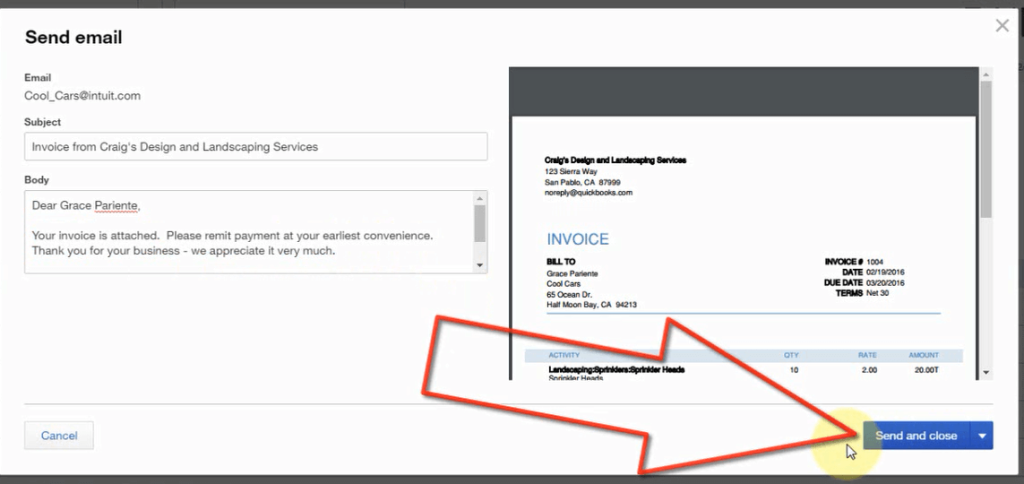
Next, you can see the email address, the subject, and the message to be sent to the customer. After composing your email, just click Send and Close.
What to Set up BEFORE Emailing Invoices
Emailing an invoice is very simple, however, you need to know about a few things that need to be set up before you get started.
1. Set up an email address in the customer account
From Customers (left navigation bar), click on Customer name, click Edit. Make sure the correct email address is indicated on this box.

Here’s a tip – You can also add additional email address by using a comma, followed by the email address, then click save.

2. Customize Invoice Settings
Now, let’s customize the invoice settings.
Go to Gear Icon > Account and Settings

Select Sales, then make a couple of changes here:
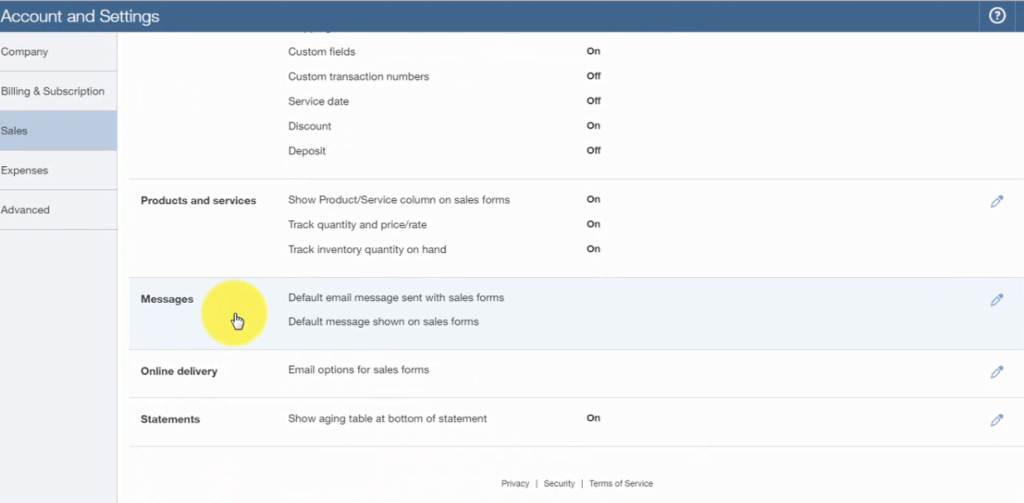
Remember when I showed you earlier the message sent with the email (the “body”)? Here we can customize the message sent to the customer. We can control that from “Messages“.
Click on the pencil icon to edit.

You can then choose what that email will look like, whether you want the full name of the customer to show or just the customer’s first name. You have some choices here on how you want your email greeting to read.
Under Sales Form, you can choose which form you will edit. In this case let’s focus on the Invoice.

You can edit the subject line (I recommend you leave it as it is).
On the Email message you can edit the message to the customer. You can also check the box underneath if you want to receive a copy of the email sent to the customer.
Then click Save when done.
3. Customize what the invoice will look like once the customer receives the email
Choose online delivery, click on the pencil icon on the right to edit.
Make sure you click the box as in the image below to “Attach sales form as PDF”. This way your customer will get a PDF copy of your invoice.

For “email options for invoices”, select Online Invoice.

Click “attach invoice as pdf”
This way the customer can pay your invoice online if he has set up QuickBooks Payments.
Click Save.
Now you know the settings you need to have in place before you can email invoices to your customers.
Be sure to subscribe to this blog below or to my Youtube channel for the latest tutorials and freebies.
