In our continuing series on customizing company settings in QBO, I will cover how to customize expense settings in QuickBooks Online. Just as a reminder, why is it important to customize settings in QBO? Because you can tailor QBO specifically for your company, you can get more functionality out of QBO, and you can save time.
Access Company Settings
First, click on the Gear Icon on the upper right hand side and select Company Settings.
Please note that some of these options are only available on QuickBooks Online Plus. See my post on Choosing the right version of QuickBooks Online.

How to customize bills and expenses settings in QuickBooks Online
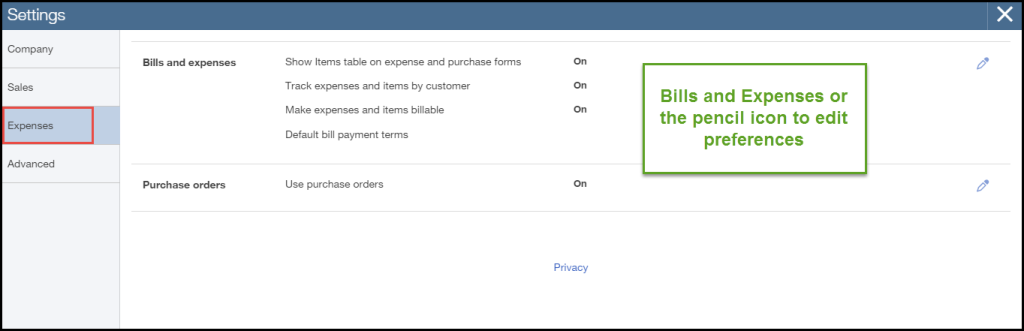
Click on Expenses on the left to customize expense settings.
Click on Bills and Expenses or the pencil icon to edit.
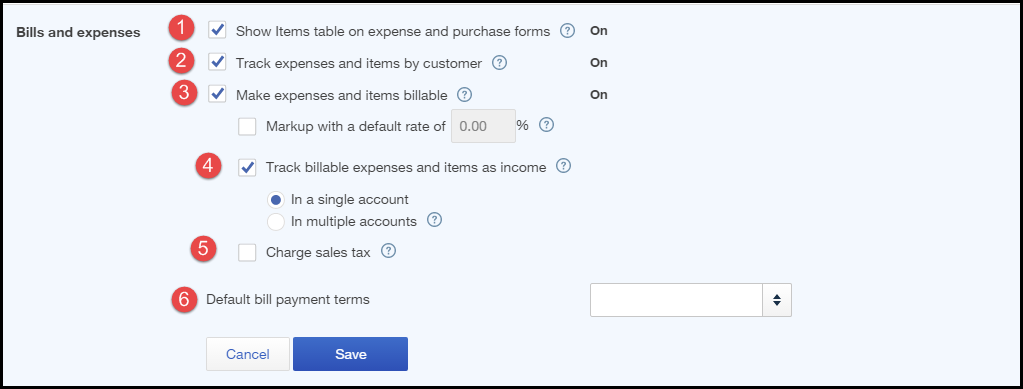
1. Show Items table on expense and purchase forms – This option adds a Product/Service table on expense and purchase forms so you can itemize products and services. You will need this if you track inventory because you will be able to enter items on purchase order forms and vendor bills.
2. Track expenses and items by customer – This option adds a Customer column on expense and purchase forms so you can track expenses and items by customer. You will need this if you want to use job costing. You will be able to assign a customer name or job/project to specific expenses on purchase order forms and vendor bills.
3. Make expenses and items billable – Adds a Billable column on expense and purchase forms so you can add billable expenses and items on sales forms. You will need this if you want to track expenses billable to customers and invoice them to customers later. You need to make sure that option #2 (track expenses and items by customer) is turned on also.
4. Track billable expenses and items as income – According to the description, QBO says to “use one or more income accounts to track billable expenses. Related setting: Advanced > Chart of accounts > Billable expenses income account”. I tested this and found it to be confusing. It appears that it is designed to track billable expenses and to mark them as income once you invoice them to them client. There are other ways to do this in a less confusing way. I recommend that you turn this feature on if you want to be able to show expenses invoiced to customers as “billable expense income”.
5. Charge sales tax – The Sales tax checkbox applies only to expenses you mark as Billable. It determines whether to add sales tax to the billable expense that you include on the invoice to your customer. You must turn on Sales Tax first (see the left navigation bar from the home screen, click Sales Tax, and click Edit sales tax settings).
6. Default bill payment terms – Here you can set up the default payment terms you will use to pay your vendors. For example, you can select net 30 – that means that QBO will flag vendor bills to be paid 30 days from the date of the vendor invoice. You can always override the default payment terms when you enter the vendor’s payment terms when you enter vendor Bills.
Click Save when you are done with this section.
How to customize purchase order settings in QuickBooks Online
Next, click Purchase Orders or on the pencil icon on the right to edit. (Just as a reminder, Purchase Orders are only available with QuickBooks Online Plus).

1. Use purchase orders – turn on the Purchase Orders feature to use purchase orders. You will most likely want to use purchase orders if you have a construction type of business or if you sell inventory. If you are not sure whether you need purchase orders then you probably don’t need to use them.
2. Custom fields – you can add up to 3 custom fields on the purchase order. QBO pre-filled 2 of them for you. You can change them. You may want to use these fields for project numbers, sales reps, and any other custom field.
3. Custom transaction numbers– this lets you assign your own numbering sequence to purchase orders. I recommend that you let QBO number them for you. It keeps things simple that way. Leave the box unchecked to let QBO number purchase orders for you.
4. Default message on purchase orders – You can add a custom message on your purchase orders up to 1000 characters long.
Click Save when you are done with this section.
Click Done at the bottom right when you are finished.
That didn’t take too long! I’ve shown you how to customize expense settings in QuickBooks Online so that you can get the most functionality out of QBO.
Here’s a Slideshare post for you:
On my next post, I will cover advanced company settings. How are you doing with customizing your company settings? Are you learning more about QBO? To know more about QBO download our free ebook by signing up below. You’ll also access our free downloads area.