This is my last post on my 5 part series on how to customize company settings in QuickBooks Online. In this final post of the series, I will cover how to customize advanced settings in QuickBooks Online. I’ll show you step-by-step how to set your company’s fiscal year, how to close the books, how to turn on chart of account numbers, and several other useful settings.
Why customize advanced settings in QuickBooks Online?
By customizing advanced settings in QBO, you can turn on/off key features so that QBO will work specifically for your individual needs and so that you can get the absolute most out of QBO.
Access Company Settings
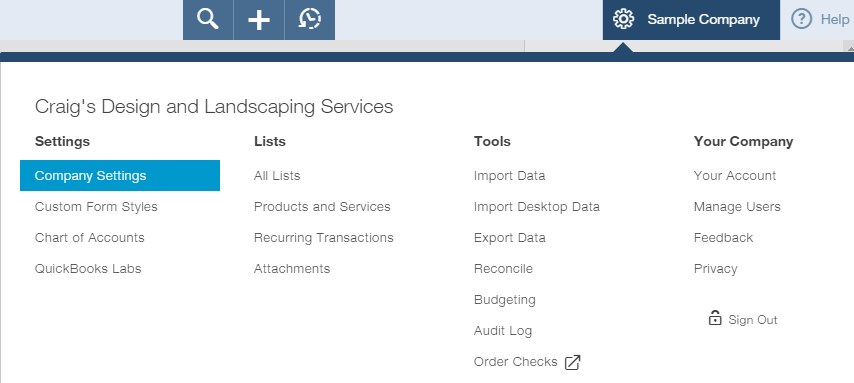
First, click on the Gear Icon on the upper right hand side and select Company Settings.
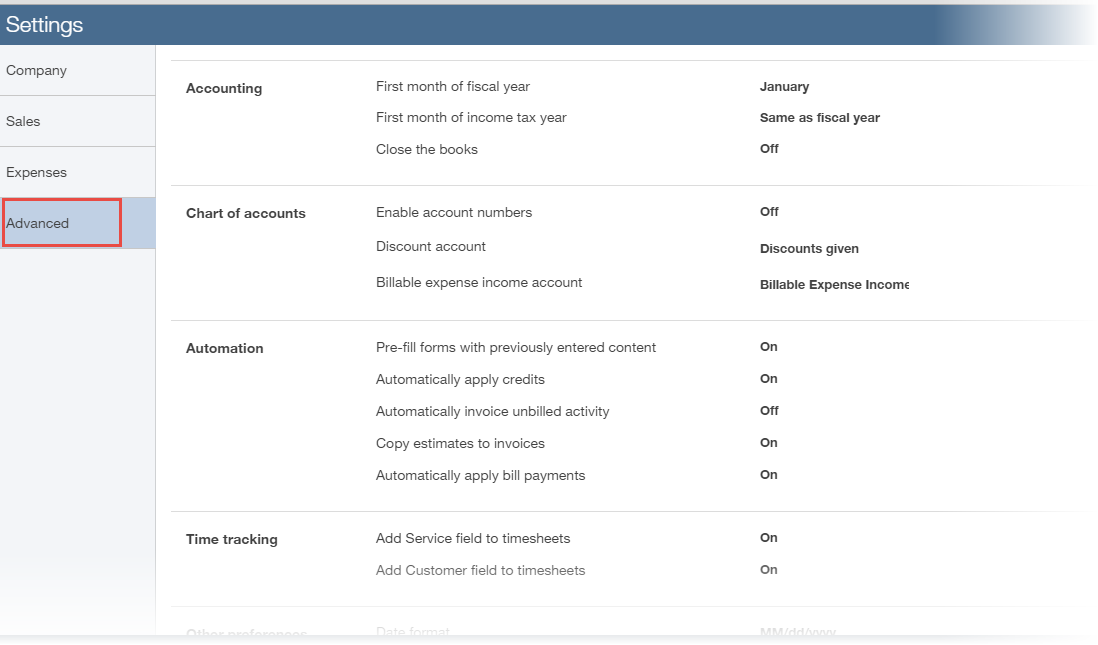
The Company Settings window will open. Click Advanced on the left.
How to change the fiscal year and how to close the books in QuickBooks Online
After opening the Advanced settings window, click on Accounting or on the pencil icon on the right to edit the fields.
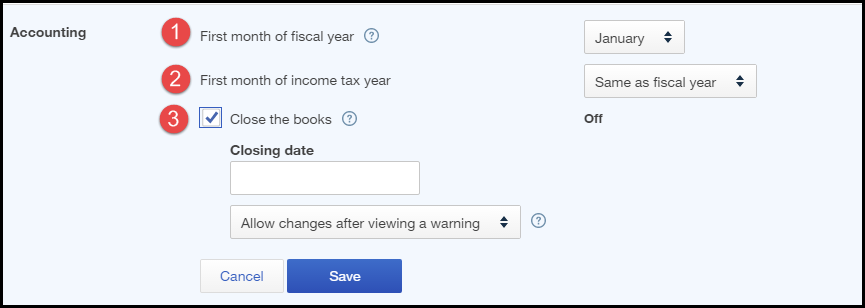
1. First month of fiscal year – you can set your company’s fiscal year if it is not a calendar year. Otherwise, leave it as it is – with January as the first month of the fiscal year.
2. First month of income tax year – you can also set the tax fiscal year if it is different from how you want to track your books. In most cases, it is the same as the fiscal year.
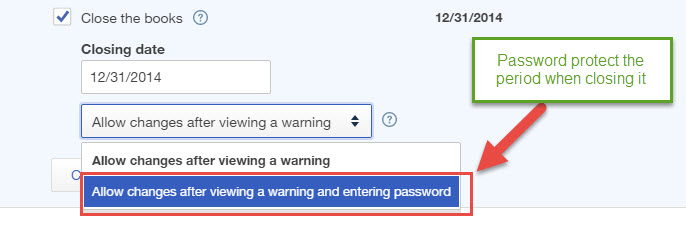
3. Close the books – how do you close the books in QuickBooks Online? It’s very simple. Just click on the box and enter the closing date. I highly recommend that you choose the option to allow changes after viewing a warning and entering a password. This way you will be assured that you are not accidentally making changes to closed periods.
What is “closing the books” and why would you want to close the books? Closing the books means that you will essentially “lock” historical data so that you don’t accidentally change it. This is very important for two reasons:
- You don’t want to accidentally change or delete historical data after a tax return has been filed
- You don’t want to accidentally change or delete transactions you have already reconciled because it will mess up your books.
Believe me, if you have ever changed your books after your tax preparer has filed your tax return, you will hear about it from them when they try to prepare your next tax return!
Click Save when you are done with this section.
How to turn on chart of account numbers in QuickBooks Online
Click on Chart of Accounts or on the pencil icon on the right to edit the fields from the advanced settings window.
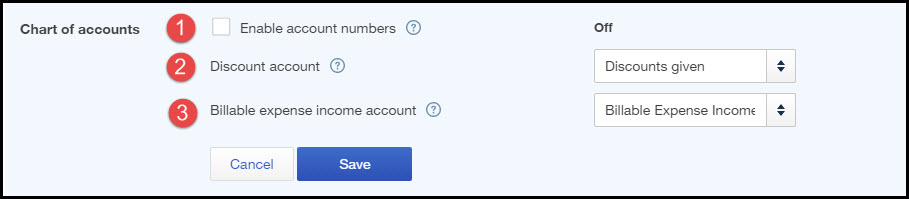
- Enable account numbers – click the box if you want to turn on chart of account numbers in QuickBooks Online. It is not required for you to use account numbers – it’s merely a preference. Your accountant may want you to use account number.
- Discount account – if you want to give discounts to customers on sales forms, you must first turn on this feature in the Sales settings (Sales > Sales form content > Discounts). Then select an account from your chart of accounts such as Discounts Given.
- Billable expense income account – if you want to track billable expense income, you must first turn on this feature in the Expense settings (Expenses > Bills and expenses > Track billable expenses and items as income > In a single account). Then select an account from your chart of accounts such as Billable Expense Income.
Click Save when you are done with this section.
How to automate entries in QuickBooks Online
Click on Automation or on the pencil icon on the right to edit the fields from the advanced settings window.
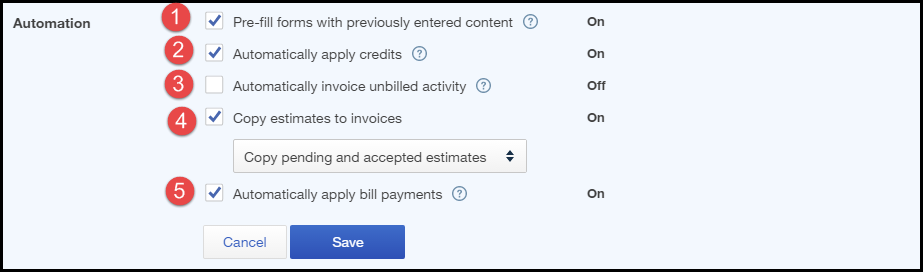
- Pre-fill forms with previously entered content – Automatically fills other fields of the form, based on the last saved transaction for that customer, vendor, or employee. Some people like this and others don’t. Try it out to see if you like it.
- Automatically apply credits – Automatically applies credits to the next invoice you create for the same customer. Most companies turn on this setting; turn it off if you’re a property manager that requires security deposits.
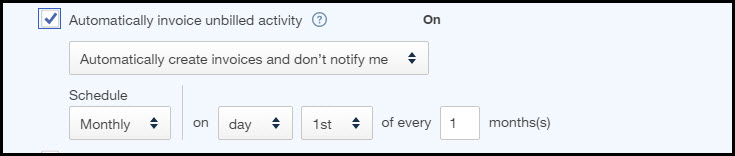
- Automatically invoice unbilled activity – Automatically creates invoices for customers with unbilled activities. Notifications appear in the Activity feed on the Home page. Click on the box to turn on this feature. You can indicate how often you want QBO to automatically created invoices for unbilled activity and whether you want it to notify you or just remind you to create invoices for unbilled activity. This is a good feature for any companies that need to invoice for billable time and expenses – this way you won’t forget to invoice your customers.
4. Copy estimates to invoices – Use this feature if you use estimates (you must have QuickBooks Online Plus) and you want the information on the estimate to be converted to an invoice in QBO. This applies to companies who use sales estimates. You can choose whether you want to copy pending and accepted estimates or only accepted estimates.
5. Automatically apply bill payments – When you add bill payments in the register, this setting automatically applies the payments to the oldest existing bill. Most companies turn on this setting. I tested this and couldn’t quite figure out how you can enter a bill payment “in the register”. I recommend that you turn on this setting as QBO recommends.
Click Save when you are done with this section.
How to customize time tracking in QuickBooks Online
Click on Time Tracking or on the pencil icon on the right to edit the fields from the advanced settings window.
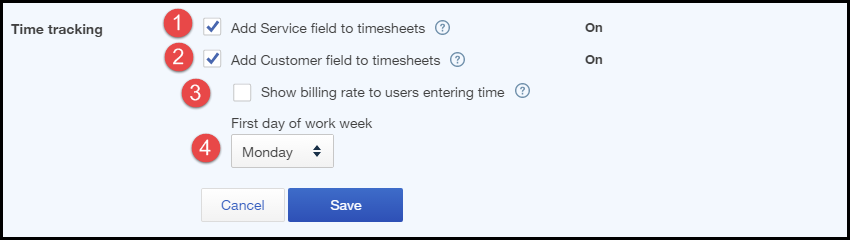
- Add Service field to time sheets – When entering time sheets, lets you specify services performed. The service field list comes from the Products and Services list. Use this to track specific services that your employees worked on. This is useful for professional services companies, trades, and contractors.
- Add customer field to time sheets – On time sheets, adds a check box to specify whether activities should be billed to the customer. Turn on this feature to enter time spent on specific customers or projects and to mark it as billable. This is useful for professional services companies, trades, and contractors.
- Show billing rate to users entering time – This allows employees to see the billing rate that you are charging to customers for labor. I recommend that you leave this blank. You probably don’t want your employees to know what you are invoicing your customers.
- First day of work week – Set the first day of your work week on time sheets.
Click Save when you are done with this section.
How to customize the date format, number format and duplicate transaction warnings in QuickBooks Online
Click on Other Preferences or on the pencil icon on the right to edit the fields from the advanced settings window.
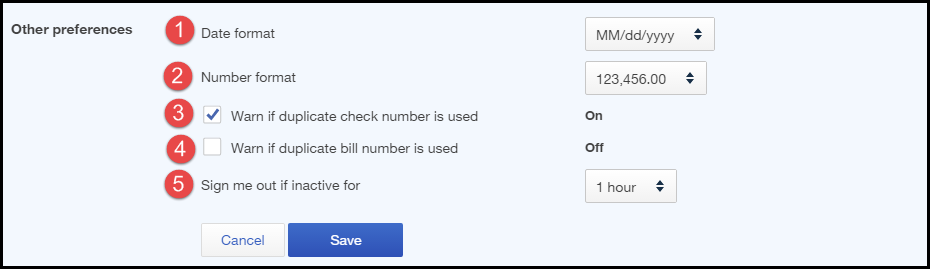
- Date format – set the date format as desired.
- Number format – set the number format as desired.
- Warn if duplicate check number is used – I recommend that you turn on this preference. You will receive a warning message when attempting to save a duplicate check number. This will help you to avoid entering duplicate transactions which will mess up your bank balance in QBO.
- Warn if duplicate bill number is used – I recommend that you turn on this preference. You will receive a warning message when attempting to save a duplicate vendor bill number. This will help you to avoid entering duplicate vendor bills so that you don’t pay a vendor twice.
- Sign me out if inactive – choose when QBO will sign you out automatically. Choose from 1 to 3 hours.
Click Save when you are done with this section.
Click Done to close the Settings window.
Here’s a Slideshare presentation for you:
Wow! I learned a lot after doing a deep dive of QBO’s company settings. Remember that this post, How to customize advanced settings in QuickBooks Online, is the last of a 5 part series. I have done my best to explain all options and to make recommendations to you so that you can fine tune your QBO company settings and make QBO work specifically for your company. Let me know if you went through all 5 sections and what you learned. Have you found any settings that saved you a lot of time? Did you find new features you didn’t know about?