
In my last post, I covered how to customize invoices in QBO. Now, I will focus on how to customize sales settings in QuickBooks Online. I’ll show you step-by-step how to set up invoice terms, delivery methods, custom fields, custom transactions, and how to customize default email messages sent with customer invoices.
Why customize sales settings in QuickBooks Online?
By customizing sales settings in QBO, you can turn on/off key features, such as customer payment terms, custom fields, custom invoice numbers, whether you will track inventory quantities, default email messages sent with invoices, and many other important features. If you want QBO to be work specifically for your individual needs, then you should to customize the sales settings.
Access Company Settings
First, click on the Gear Icon on the upper right hand side and select Company Settings.
![]()
The Company Settings window will open. Click Sales on the left.
![]()
Customize sales form content
Click on the pencil icon next to sales form content to edit the preferences.
I’ll explain each feature step-by-step.
To turn features on, make sure the box next to the feature is checked or choose the appropriate item from the dropdown list.
![]()
1. Preferred invoice terms – Select the default customer payment terms that you want to show on an invoice. The customer payment terms are the number of days in which you want your customer to pay you. “Net 30” means payment is due from your customer 30 days from the invoice date.
2. Preferred delivery method -The Delivery method default determines the way you’ll deliver sales forms to newly-created customers. You can change the default delivery method for a customer by editing the customer on the Customer List. You can also change the delivery method when you create individual invoices or other sales forms. Choose from:
- Print Later
- Send Later
- None
I recommend that you choose Send Later if you will primarily send invoices to clients via email.
3. Shipping – Adds shipping fields (date, tracking number, destination, subtotal) to sales forms. Use this if you sell inventory and need to include a shipping field on an invoice.
4. Custom fields – Adds extra fields to sales forms. Select “Internal” to show the field in QuickBooks (so that only you can see it). Select “Public” to show the field on customer forms so that the customer can see the field.
5. Custom transaction numbers – Lets you use your own numbering system on an invoice. If left blank, invoice numbers are automatically assigned by QuickBooks. I recommend that you let QuickBooks automatically assign invoice numbers. QuickBooks will number invoices consecutively (in numerical order).
6. Service date – Adds a Service date field if you need to track the date a service was performed separately from the invoice date. This is useful for service-based companies like professional services, personal services, repairs, etc.
7. Discount – Adds a Discount field to invoices and other sales forms.Turn this feature on if you want to show discounts given to clients on invoices.
8. Deposit – Adds a Deposit field to invoices so you can subtract a customer deposit from the total to calculate the balance due. I recommend that you leave this blank. I have found that using this feature can make other transactions seem confusing. There are other ways to record deposits in QBO using items from the products and services list.
Click Save when you are done.
Products and services settings
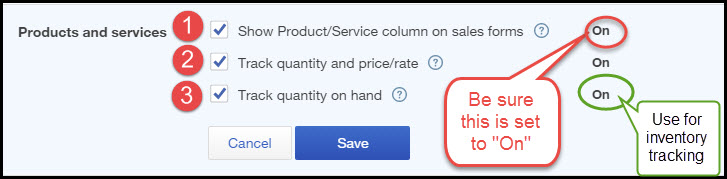
1. Show Products/Service column on sales forms – Adds a Product/Service column on sales forms so you can choose from a list of products and services to include. Be sure this feature is turned on.
2. Track quantity and price/rate – Adds Quantity and Rate fields to sales forms so you can track this information for products and services. This is useful if you sell inventory. You may also use this if you sell services by the hour.
3. Track quantity on hand – Lets you track available stock for each product you sell and its related inventory costs. Turn this feature on if you will be tracking inventory quantities.
Click Save when you are done.
Default email message sent with invoices and sales forms
With QBO, you have the ability to email invoices and other sales forms to customers. Did you know that you can edit the default email message that your customers receive?
From the Sales Settings (Gear Icon > Company Settings > Sales), Click Messages (or the pencil icon on the right) and you’ll see the section called Default email message sent with sales forms.
Click on the pencil Icon on the right to edit the default messages.
![]()
1. Select a greeting. You have several options to choose from.
2. Select the sales form you want to customize. Choose from:
- Invoice
- Estimate
- Credit Memo
- Sales Receipt
- Statement
3. Edit the subject line of the email.
4. Edit the message that your customer will receive. I recommend that you include a phone number for clients to call, and also your website address. You want your customer to be able to contact you if they have any questions about your invoices so that you can get paid faster.
5. Click the box if you want to receive a copy of the email sent to the customer
Click Save when you are done.
Default message sent on invoices or other sales forms
Do you need to add a “Happy Holidays” message or a “Thank you for your business” message on all your invoices? How about adding wire transfer instructions? Use the default message box.
![]()
From the Sales Settings (Gear Icon > Company Settings > Sales), Click Messages (or the pencil icon on the right) and scroll down until you see the section called Default message shown on sales forms.
1. Select the sales form from the list. You have the choice of:
- Estimate
- Invoices and Other Sales Forms
Choose Invoices and Other Sales Forms in order to set up a default message on an invoice form.
2. Enter the message that you want to show on the invoice form. This can be a “Thank You For Your Business”, “Happy Holidays”, or information about your latest sale.
Click Save when you are done.
How to email invoice as a PDF to customer
From the Sales Settings (Gear Icon > Company Settings > Sales), Click Online delivery (or the pencil icon on the right).
![]()
Click the box to attach an invoice as a PDF when you email your customer the invoice. You also have the option to show summarized or detailed invoice information on the email.
Choose the email format that you want to send: 1) online invoice, 2) HTML email, or 3) plain text email. I suggest that you use HTML email or plain text email.
Click Save when you are done.
Statements settings in QBO
Statements are reminders you can send to customers when they have past-due balances. Statements list details of the transactions that are past due.
From the Sales Settings (Gear Icon > Company Settings > Sales), Click Statements (or the pencil icon on the right).
![]()
A statement includes all unpaid transactions for a customer. Choose how much detail to include – list each transaction (invoice, or payment) as a single line on the statement or list each transaction including all detail lines. I recommend that you choose List each transaction as a single line so that your statement doesn’t get too cluttered.
I also recommend that you select Show aging table at bottom of statement. This way, your customer will see how old their past due invoices are. An “aging table” categorizes past due invoices based on how old they are (0 to 30 days, 31 to 60 days, etc).
Click Save when you are done.
Here’s a Slideshare presenatation for you:
Wow! That was a lot of material to cover! This may seem like a lot of detail but these are very important settings that will allow you to make your invoices look the way you want and will help you to get paid faster. That concludes the section on how to customize Sales settings in QuickBooks Online. Next time, I will cover customizing Expense settings. Don’t worry – it’s a short section. I hope that you are finding these blog posts helpful and that you are on your way to doing 5MinuteBookkeeping!