Hello again. I hope you are keeping up with all of our step-by-step QuickBooks Online tutorials. In my past two blog posts, I have focused on Setting Up Vendors and Working with the Vendor Center . In this post, I’ll show you how to enter a vendor bill in QuickBooks Online.
What’s a vendor bill?
A vendor bill in QBO refers to the invoice that a vendor sends you. A vendor is person or a company who sells products and services to your company.
Why should you enter vendor bills in QuickBooks Online?
You should enter vendor bills in QuickBooks Online in order to:
- Track what you owe to vendors – you’ll be able to see all of the bills that you owe to your vendors from one window. This will help you to manage your cash flow and track due dates.
- Prevent the possibility of paying a vendor twice by mistake – by entering the bills in QBO, you’ll be able to track the specific bills that you paid. This way, you will avoid accidentally paying a bill twice.
- Pay a vendor with one check for multiple bills – If you need to pay a vendor for more than one vendor bill, QBO does the math for you and tells how exactly how much to pay that vendor. This saves you time and you won’t have to write more than one check to that vendor.
- Print checks in QBO – Entering bills makes it easy to pay bills and print checks with just a few clicks.
Some people prefer to enter vendor bills in QBO while others don’t really want to take the time. It’s your choice. It really won’t mess up anything in QBO – you just have to follow the right steps.
How do you enter a vendor bill in QBO?
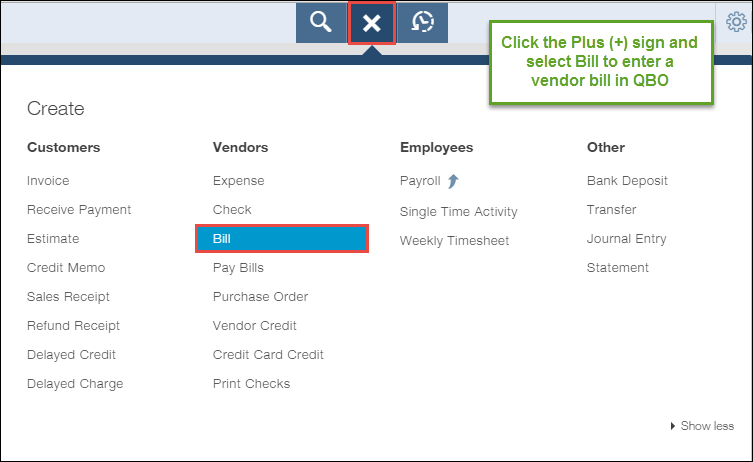
Entering bills is simple. Click on the Create Menu (the Plus + sign at the top center) and select Bill.
The enter bills window will open:
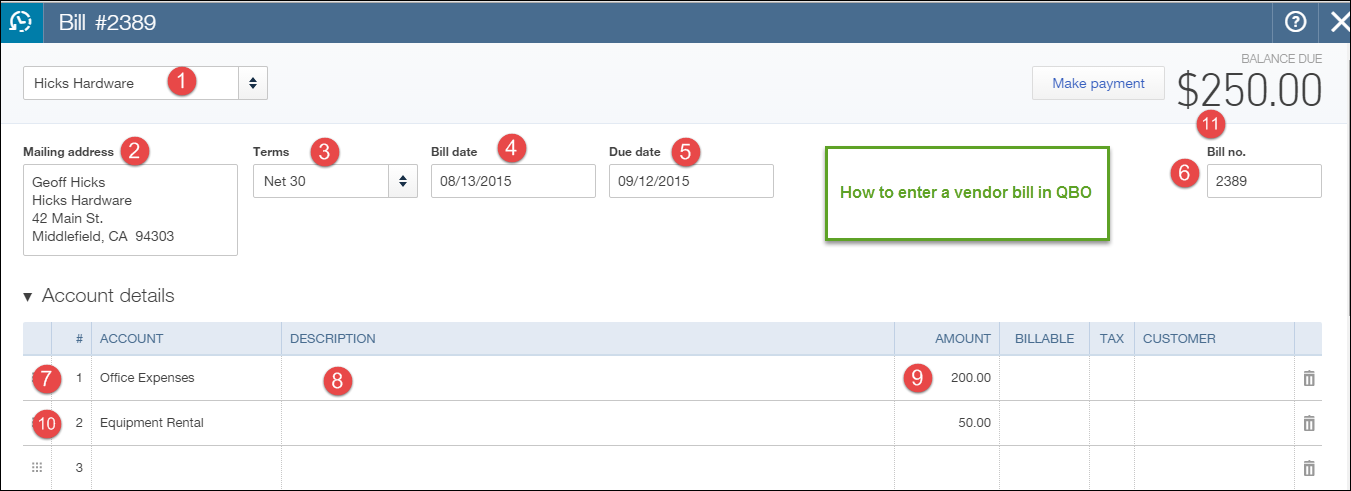
- Vendor name – Enter the vendor name or select it from the list.
- Mailing address – The mailing address will be automatically added if it’s already set up in the vendor’s file in QBO.
- Terms – The payment terms will be automatically added if it’s already set up in the vendor’s file in QBO. If not, enter the payment terms. Net 30 means that the bill is due in 30 days.
- Bill date – Enter the date of the bill. FYI – the date of the bill determines the “posting date”. That means that the bill will show up in your reports based on the bill date.
- Due date – this will be calculated automatically if you entered the payment terms.
- Bill no. – enter the vendor’s invoice number.
- Account – enter or select the account (category) to be used from the dropdown. The account list comes from the chart of accounts.
- Description – enter a description if necessary. This description shows up on your reports.
- Amount – enter the amount of the bill.What if you are paying for more than one type of expense on one bill? No problem. Simply “split” the transaction.
- Just add the additional account (categories) in the lines below. Be sure to enter the account, description (optional), and the amount.
- Balance Due – Make sure that the total amount due equals the total on the vendor’s bill.
Click Save and Close when done.
I recommend that you write your initials on the vendor bill so that you know that you entered it in QBO. Now you can save an electronic or paper copy. I prefer to save an electronic copy.
Now you know how to enter a vendor bill in QuickBooks Online. It’s simple!
Wow, I can’t believe I got through this tutorial with only two images! Do you want to get notified as soon as our step-by-step tutorials are published? Subscribe to our blog below. Have fun entering vendor bills!
great but we cannot print it after entering the bill. strange and does not make sense if such a great software dont have option to print vendor bills, no option to print customer payment receipt.
I understand that it can be frustrating if you can’t print the vendor bill or customer payment. While I cannot speak for QuickBooks as to why they don’t have that functionality, I would say that the goal of working with cloud-based software, such as QBO, is to also eliminate paper. Have you considered eliminating printing paper forms?
how can i enter vendor , and add a job location ? i have vendors that send invoices for multiple jobs we are doing .
Hi. Check out this blog post showing you how to add jobs in QBO. https://5minutebookkeeping.com/how-to-add-jobs-in-quickbooks-online/
You also need QuickBooks Online Plus to be able to track jobs.